 |
 |
 |
|
I'm learning the art (or is it a craft?) of stained glass. At this weblog, I record progress, note useful links, and document flesh wounds. Links
The Art League
Weisser Glass Studio
Virginia Stained Glass Co.
Warner-Crivellaro
Glass Galleries Links List
The StoreFinder: Stained Glass Store Front
ArtGlassArt.com Tutorials
rec.crafts.glass
Nancy's Beginner Tips and Tricks
Splinter Removal Tips
Syndicate this site
Archives
By Date
November 2006 October 2006 May 2006 June 2004 October 2003 September 2003 August 2003 June 2003 May 2003 April 2003 March 2003 February 2003 January 2003 December 2002 November 2002 October 2002 September 2002 By Project Beaded Unity Candle Crocus Panel Dogwood Windows Green Tiered Lamp Lilypads/Lotus Panel Transoms Xmas Ornament |
 |
Project Archive: Xmas Ornament
This Christmas tree ornament was my third stained-glass project, a small and rather spur-of-the-moment one. I did it over a couple of afternoons during the week of Christmas 2002. Wednesday, December 25, 2002: Introducing the Fisher-Price My First Stained-Glass Christmas Tree Ornament
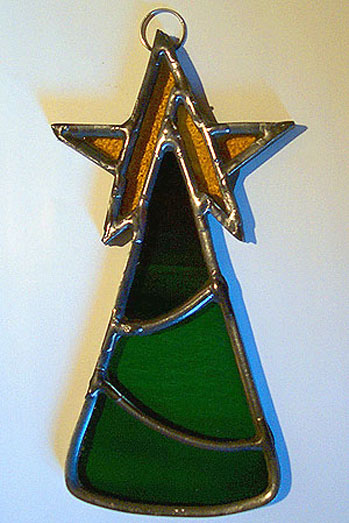 I built this ornament (about five inches tall) this week from scrap glass, skinny lead that I'd decided not to use on the transoms after all, and some U-shaped lead for the edges. I am aware it came out all crookedy, but I prefer the term "experimental." I built this ornament (about five inches tall) this week from scrap glass, skinny lead that I'd decided not to use on the transoms after all, and some U-shaped lead for the edges. I am aware it came out all crookedy, but I prefer the term "experimental."
I drew the pattern freehand on a legal pad, and didn't bother with a duplicate building pattern, though in retrospect I think I ought to have. Putting it together was interesting: no straight edges meant that I couldn't build out from a corner the way you would a rectangular panel, so this was another of those situations where having about five hands would really be the best way to deal with it. Working with U lead (for edges, instead of H lead for interior seams) was fun, actually. It's easier to cut than H lead, but it was an absolute bear to stretch---my lead stretching clamp just didn't want to grab on to the came. The big challenge with this ornament was in leading the pieces of the star that have the small triangles attached to their sides---it's one line visually, but for construction, it needs to be U lead for the edge, then H lead to hold the triangle, then U lead for the edge again. The challenge was to join the three pieces of lead to make one relatively straight line, preferably not too uglified by great globs of solder. I also played with finishing compound for the first time on my ornament here. A word to the wise: when they say to buff with a soft cloth, they mean a really soft cloth, if you patinaed. The silly part of all this is, you'd really want to do a little, funny-shaped ornament like this using copper-foil construction, not lead came. But I only know how to do lead came, for the moment, and so that's what I did. All in the name of scientific inquiry. Tonight I gave the ornament to Momma Bastard. I told her that I'm not sure whether or not it will have all fallen apart when she unboxes it for next Christmas, but that if it does, I'll make her another one. Hopefully by then in copper foil, which will help it look less like kindergarten stained glass, and will be sturdier too if it's funny-shaped like this one. Momma Bastard was very gracious about my smushed-looking star, I am pleased to report. Next year's ornament gets a building pattern. Definitely. Posted by Michelle at 10:13 PM
| Comments (4)
|
| Copyright © 2002-06 Michelle Kinsey Bruns. E-mail me at my first name at this domain. (Take that, spam spiders!)
|
||