 |
 |
 |
|
I'm learning the art (or is it a craft?) of stained glass. At this weblog, I record progress, note useful links, and document flesh wounds. Links
The Art League
Weisser Glass Studio
Virginia Stained Glass Co.
Warner-Crivellaro
Glass Galleries Links List
The StoreFinder: Stained Glass Store Front
ArtGlassArt.com Tutorials
rec.crafts.glass
Nancy's Beginner Tips and Tricks
Splinter Removal Tips
Syndicate this site
Archives
By Date
November 2006 October 2006 May 2006 June 2004 October 2003 September 2003 August 2003 June 2003 May 2003 April 2003 March 2003 February 2003 January 2003 December 2002 November 2002 October 2002 September 2002 By Project Beaded Unity Candle Crocus Panel Dogwood Windows Green Tiered Lamp Lilypads/Lotus Panel Transoms Xmas Ornament |
 |
Sunday, May 04, 2003: Appointment Glass
I've been having student-guilt deja vu just lately. It's not that I was ever a bad student, but I tended to be a lazy one. A fortunate aptitude for exams meant that homework always seemed unnecessary. I am positive that I must have caused at least one teacher over the years to re-evaulate the exam/homework proportions of his final-grade formula.
No one is grading me on stained glass ability, but I'm finding it tough these days to set aside time to do stuff outside of scheduled class time. My second class at The Art League has been going for, what, four or five weeks now, and today was the first time I managed to put in any serious basement time on my project. Who wants to hang out in a musty cellar, now that the weather's seemingly decided to stick with this spring thing for a while? I'm building a ninety-six-piece, twelve-sided tiered lamp, whose overall shape is pretty similar to that of Protein's lamp. This is a step up from the four-sided panel lamp I'd originally planned to build in this class. I guess I wanted more of a challenge, and more bang for my glass-class buck. Have I mentioned before that I tend to be sort of a glutton for punishment? I don't have a photo of the lamp in question, only a pattern. I can show you the pieces I've cut and ground, though, and maybe you can use your imagination here. 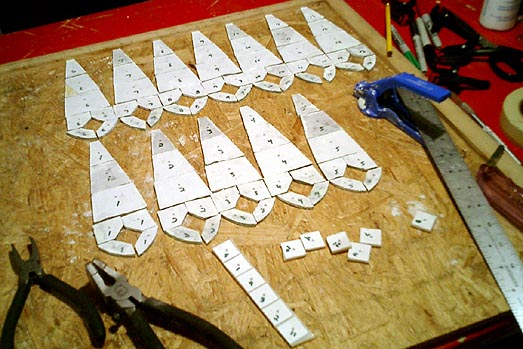
The glass I'm using is Youghiogheny Stipple, number 1574, described on Youghiogheny's website as "Ice White, Pink, Green, Silver Yellow (Spring and summer flowers)." I bought several 9x12s of this at Weisser's spring sale, and the run I bought from must've been low on white and yellow, because it mostly looks mottled green with swirls of red. It sounds horrifically ugly. It might even be horrifically ugly. I haven't really decided yet. 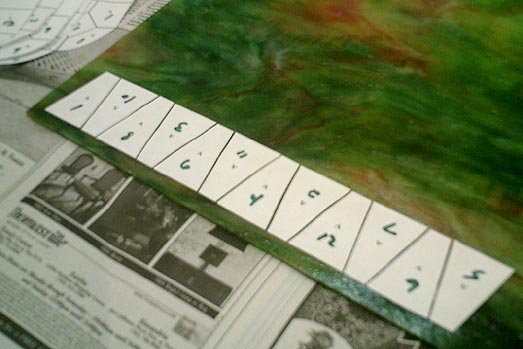
The design of the lamp calls for one small accent chip on each of the twelve "sides," and I wasn't really feeling a bevel on what could already be a seriously ugly lamp, so I'm using a cream color out of the class scrap bin. It looks like a Bullseye, judging by some very distinctive peculiarities in the texture of the glass that are very like those in the Bullseye red I used for my crocus panel last fall. I'll try to remember to ask Jimmy at class tomorrow; he's a human glass catalog and I'll be ever so tickled if I guessed right. So anyway, this cream-colored glass, it's an interesting choice to go with the swirly green-with-red, because if you hold the cream glass right up to a light, it has a red undertone in its glow. Totally super-subtle. I've been spending my class sessions cutting glass (and skipping out early, class is right around the block from where I work on Mondays, so going home would be pointless, which makes for very long Mondays), which is same old same old. I finally bought a Toyo pistol-grip cutter maybe six weeks ago, and am terribly glad I did. It's almost ten times as expensive as the basic steel-wheel cutters you can buy at the hardware store, but easier to maneuver, although the pivot tip can sometimes develop a mind of its own on types of glass that don't ever seem to come in perfectly flat sheets, like say, Youghiogheny Stipple. Still, it's well worth its price---I felt like I was just bludgeoning my glass to death with my old cheapie cutter; cutting works better for me now with the Toyo. I finished cutting glass last Monday. Grinding would be the next task, and the choice between using my own grinder at home or using the ones at class that are used by twenty to thirty people per week finally motivated me to do some homework already. That's how I came to finally use my brand-new Nick's Grinder's Mate for the first time. The Grinder's Mate is a tool I've seen alternately praised to the heavens and maligned as "SNUP" (cute Glass Chat slang for Serves No Useful Purpose), and it was relatively low on my long list of Glass Things To Spend Money On when one arrived in the mail for me, as if by magic, from someone who apparently could not stand the thought of ever again having to look at a creepy, up-close photograph of my mutilated fingernails. (Hi, Liz. Sorry 'bout that.) It does take a few minutes' acclimation, a large part of which has to do, I believe, with the dire instructions on the packaging about not holding the Grinder's Mate by its top handle. The natural instinct to do so is very strong---I've been reading The Inmates Are Running the Asylum by noted "interaction designer" Alan Cooper lately, and while his book focuses on software-based products, I'm pretty sure that Mr. Cooper would want to know why a feature of a hand tool that is shaped very much like a handle and is positioned very much like a handle is not, in fact, a handle. Still, once I got over it and adjusted to holding the Grinder's Mate by its hinge, there's no denying that my fingers are grateful for the new work distance from both sharp glass edges and diamond-dust grinder heads. I ground all 96 pieces of my lamp today and nothing hurts, can I get an amen. Beats the hell out of trying to work with fingers losing circulation due to several layers of almost-protective electrical tape, too. So tomorrow at class, in theory, I get to do some fun stuff, by which I mean, learn something new. I really have little to no idea how construction of a tiered lamp works. That's what Jimmy's for. Yay Jimmy! With any luck, I'll have some photos of new, fun stuff soon. Speaking of which, I have a huge backlog of things I want to post here. Let's see: a summary of things learned at Weisser's foil class... figuring out how to attach Glass Bug: The Sequel to the lilypads panel... a way, way overdue photo of the "finished" crocus panel... a couple of photos of stained glass from around DC that I've been meaning to share... small progress on the transom-installation odyssey... some photos and thoughts from the Frank Lloyd Wright glass exhibit at the Renwick... mild griping about my disappointment with the first stained-glass project/technique book I've ever bought. I think that's all of it. The bad-student-guilt contributes to this backlog considerably. The internal logic goes like this: If you're going to spend a bunch of time playing with or writing about glass, it had better be related to your class project, YOU BAD LAZY SLACKER YOU. Still, all the loose ends are driving me quietly mad. So you see the rough spot I'm in, here. More news on my battle with my conscience, as it happens. Posted by Michelle at 11:19 PM
| Comments (1)
Tuesday, May 06, 2003: The Impatient Need Not Apply
Some photos from last night's class.
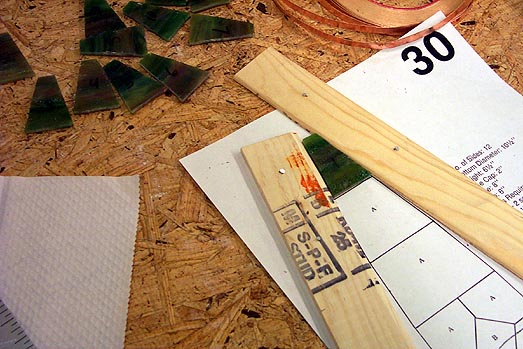
Lamp pieces need to be really precisely cut if they are to all fit together for a nice tight 3D construction. I spent most of class sliding pieces into a wooden jig, nailed on top of a copy of my pattern, to make sure everything is sized properly. The idea is to work one "ring" of the lamp at a time, downward from the top, and reposition the jig as needed for each ring. This would probably be sort of tedious work under the best of circumstances, but was maddeningly so at class last night: any time I found a piece that was a hair too big (which is to say, every one of them) I'd have to walk over to the grinders in the other room, shave off a fraction of an inch, come back, fit it again... wash, rinse, repeat. I probably walked a mile last night without ever leaving the building. 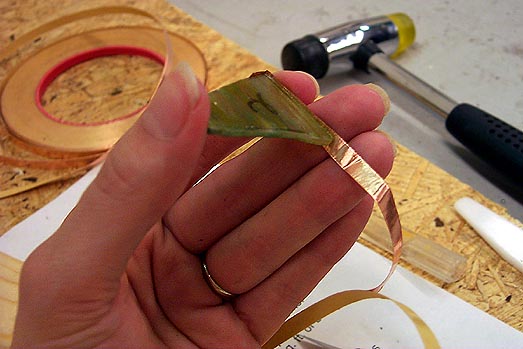
And, here's me, foiling lamp pieces. Also fairly tedious work, especially on glass like the Youghiogheny I'm working with on this project. The sheets don't come flat, but instead sort of warped, like plywood that's been rode hard and put up wet. If the piece being foiled in the above photo appears to have a curvy-cut edge---it doesn't, the cut is perfectly straight, when the piece is viewed straight on. Rather, the curve you can see is in the cross-section of the glass itself. Not only does that make foiling even pickier than it has to be, but it also makes me suspicious that the curvature is going to have to make my life difficult somehow, come construction time. And, oh---I was right; the cream-colored glass I'll be using for the accent pieces in this lamp is a Bullseye. I'm entirely too pleased that I was able to guess that based on its texture alone; clever me. When your hobby makes you think you need a hobby, what then? Posted by Michelle at 10:08 PM
| Comments (8)
Monday, May 12, 2003: Twinning Transoms
We now have two transoms installed. Yay!
I officially can no longer procrastinate on getting the third and final one puttied. Posted by Michelle at 10:43 PM
| Comments (10)
Tuesday, May 13, 2003: Frank Lloyd Wright's Glass, In The Flesh
So Eve and I went to the exhibit of Frank Lloyd Wright stained glass at the Renwick last month. I've said before that Frank Lloyd Wright's designs aren't really to my taste, as I often find very geometrically styled art to be a little on the arid side.
But, as I suppose is true for most artwork, it's really best to judge it up close and in person. Standing in the gallery and looking at the work, I found myself struck more by the rigor and intricacy of the work, than by all the straight lines and hard angles. The pure craftsmanship of the work is also something you can't focus on while looking at two-dimensional printed representations of the glass panels. Although, I'd be curious to know how much of Wright's cutting and leading he did himself, and how much he delegated to flunkies. Was he more artist or craftsman? Glass artists often lament how hard it is to get a good photograph of their work. And it's true. I snapped a few photos, before noticing the too-discreet "no photography" sign. But they do not at all represent the aspects of the panels that fascinated me: the glass which had, at some point a hundred years ago, been gilded or iridized but now shows almost no sign of either; the putty beginning to crumble in spots but altogether impressively solid considering the age of the work; the flashed glass that I had to hold a couple of sneaky fingers behind to verify its near-total opacity; the brass and copper cames which I've never seen used before and which I will never use myself because I am too fond of curves; the tiny tiny scale of some of the pieces of glass, which dispels any notion of straight lines being the fastest road to an "easy" panel. 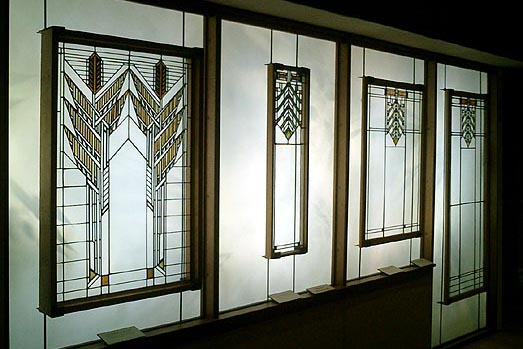
Above is a sample window (on the left) from the Susan Lawrence Dana house in Springfield, Illinois, dating from 1902-04, and three panels from the J.J. Walser Jr. house in Chicago, circa 1903. 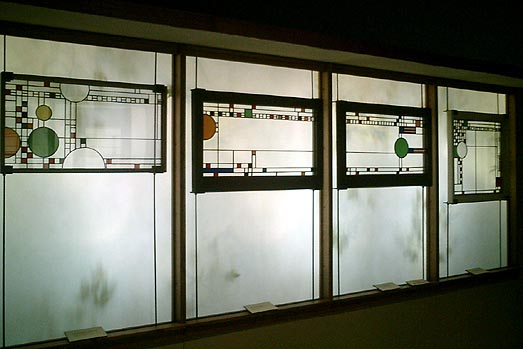
Above are four panels from the Avery Coonley Playhouse in Riverside, Illinois, 1911-1912. And I need to point out here that I'd previously assumed that "playhouse" meant a performing arts center---but what it actually means, in this case, is... a kindergarten. Imagine four-year-olds scampering around with sammich hands and runny noses... in a building fully tricked out with Wright windows and furnishings. Amazing. There was a little reading room at the end of the exhibit, with several piles of books on Frank Lloyd Wright strewn about for the edification of the patrons. One book caught my eye: Frank Lloyd Wright in Pop-Up. No, I'm not kidding: 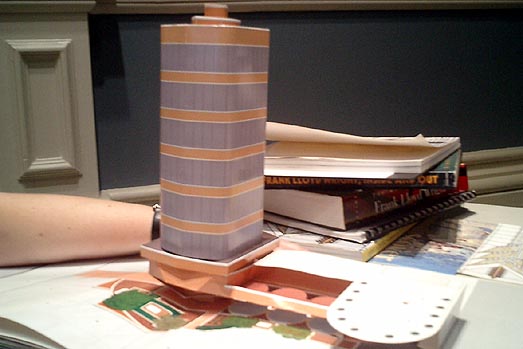
Other notes, more or less at random: Froebel blocks, developed in 1830s Germany, are sets of wooden blocks to teach children about geometric shapes and patterns. Wright had been given some by his mother when he was a child, and wrote in his autobiography of how strongly they had influenced his life's work. The exhibit had a window made of prismatic glass tiles, a Wright invention about which I wrote back in November (here and here). Neat to see them, but it would have been so much neater if they'd been displayed in such a way as to make their function apparent. There would have been an undeniable "wow" factor in seeing a light source redirected to a wall in the back of the room using the prismatic glass tiles. As it was they were just sort of hanging there, looking as if they were trying to be decorative and failing. Innovative as they are, they're not much to look at. Google helped me find a complete checklist of works included in the exhibit, on the press information page for the Smithsonian American Art Museum. The exhibit runs through July 20th. I mentioned before that Nancy Underwood, owner of Weisser Glass Studio in Kensington, would be doing a leaded glass demo at the Renwick in conjunction with the show. That has passed---weekend before last, I think---but there's another demo scheduled, for the last day of the exhibit at one p.m. It's being given by none other than Jimmy Powers, with whom I'm currently taking my second glass class at the Art League. He's a nice guy, a very knowledgeable glass craftsman, and a great, encouraging teacher, so if you're curious to see stained glass built before your very eyes, don't miss his demo. If you need further convincing, remember that the Renwick, as part of the Smithsonian Institution, costs not a penny for admission. Posted by Michelle at 10:20 PM
| Comments (7)
Friday, May 16, 2003: Thou Shalt Not Covet Thy Neighbor's Glass
Last week in class, Jimmy was telling us that he'd been on---I was only half listening while foiling lamp pieces---some sort of architectural/stained-glass tour of D.C. I don't know what it was or who put it on, but it sounds like fun and I'm sorry I missed it.
Although, if I had known about it in advance, I would have been sorely conflicted. It was held on the same day as the Takoma Park House and Garden Tour, which I wouldn't have missed for the world, due to the long-wished-for opportunity to explore the inside of the Cady-Lee mansion at the intersection of Eastern Avenue and Piney Branch Road on the DC/Takoma Park, MD border. I gape at this house every time I pass by it. It's a vast and lovely Queen Anne-style Victorian, and it has porches and balconies for miles. I never knew what it was called or anything about it until the Takoma Park house tour was announced, at which point my thought was: I am SO THERE. 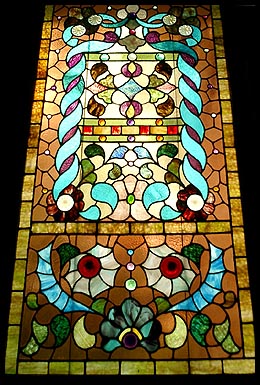 The icing on the Cady-Lee cake was the large, vibrant stained glass window on the landing of the house's main staircase. I never knew that was there, either. A tour volunteer told us that it is original to the house, making the window something like one hundred and sixteen years old. The icing on the Cady-Lee cake was the large, vibrant stained glass window on the landing of the house's main staircase. I never knew that was there, either. A tour volunteer told us that it is original to the house, making the window something like one hundred and sixteen years old.
The window is undeniably striking, especially in its prominent position in the front foyer. But I wonder whether any inhabitant of the house has ever been given the heebie-jeebies by the bottom portion of the window. Or am I the only one who sees the face of an evil, undead wild boar there? Red rondels for eyes; highly textured pale yellow glass for tusks; faceted jewels marking the ridge of the snout. I guess the other possibility is that I shouldn't have put all that cayenne pepper into last night's dinner. Jimmy did mention that one stop on his tour was the National Cathedral in Northwest DC. Longtime readers of my site will remember my photos from Cathedral Day 2001. Every September, they open up the cathedral to visitors and make a sort of fair out of it. The best part is the tower climb. If you show up early enough on the day to score one of the limited quanitity of climb tickets, you can take a tour very nearly all the way to the highest point of the cathedral, where you'll see a demonstration of the ringing of the bells, which appears to be a much more athletic activity than you might have guessed.  Jimmy didn't know about Cathedral Day, and I was too happy to have the chance to ramble on to him about it. Told him that he must go sometime, if only for the opportunity to get an up-close look at some of the cathedral's 215 stained-glass windows that must ordinarily be admired at a distance. Jimmy didn't know about Cathedral Day, and I was too happy to have the chance to ramble on to him about it. Told him that he must go sometime, if only for the opportunity to get an up-close look at some of the cathedral's 215 stained-glass windows that must ordinarily be admired at a distance.
Two days after waxing rhapsodic about Cathedral Day to Jimmy, I found myself in a veterinarian's waiting room with nothing to read. I picked up a copy of a little neighborhood weekly paper and had a browse. Lo and behold: the National Cathedral is looking for docents to conduct tours and educational presentations. "Volunteer docents will receive in-depth training in specific areas, such as iron work, stained glass and gargoyles." Once again: I am SO THERE. If they'll have me. The cathedral is an awfully special place to me, for many reasons, and I think it sounds like a lot of fun spending a few hours a week helping other people fall in love with it too. Posted by Michelle at 11:37 AM
| Comments (2)
Sunday, May 18, 2003: Fun With Solder
I was promised at class last week that if I could come in this week with all of my bottom tier sets soldered together, I would be able to have my lamp mostly constructed by the end of class. As motivation, this promise is quite effective. I've realized I like lead projects better than copper foil, because there is so much tedious manual labor to be done on a foil project before you ever get to anything resembling construction. All that wrapping glass in sticky copper tape entails precisely none of the excitement of starting to put together a lead project.
So I spent odds and ends of evening time foiling, all week long. I even recruited Don as a lackey---er, apprentice. He wants me to teach him how to build stained glass, too. And I will. Right up until he begins to show signs of being better at it than I am. Today, foiling finished, I broke out the soldering iron. Only one of the four tiers or rings of my lamp design is made up of more than one piece of glass---that's the bottom tier, five pieces of glass on each of twelve sides. I started today working with sixty bits of lamp and ended up with a dozen larger bits of lamp. 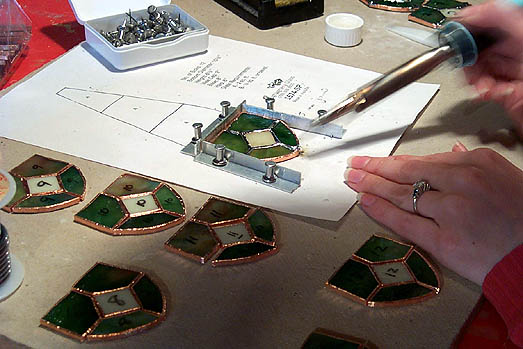
I realized, far too late for a fix, that the jig against which I was sizing all the pieces for this bottom tier was set up a little bit cockeyed. Which means that all my five-piece soldered sets from today came out a little bit cockeyed. I won't tell if you don't. I also made excellent use today of a recent Home Depot impulse buy. Next to the display of C-clamps in every size imaginable, I found these little plastic pincer-type clamps, 3 or 4 inches long, sold in sets of four: the perfect implement for holding glass while doing edge work with the soldering iron. The glass can become very hot, so a grabbing implement is an awfully nice thing to have handy. Although such an implement is still insufficient to save me from myself, given my foolish habit of burning my fingertips by flicking away errant balls of not-actually-cooled-yet solder. 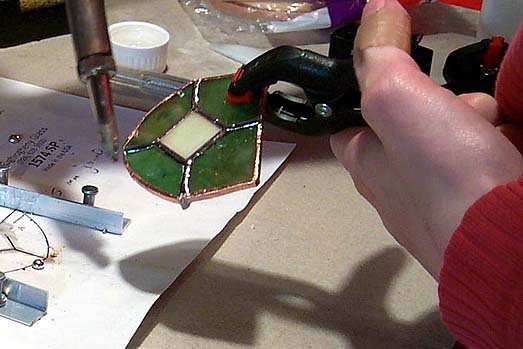
All in all, I'm not one hundred percent happy with my crookedy soldered sets, but it'll have to do. As always, gnarly mistakes are inevitable and even necessary for the perfection of any skill. If I can come home from class tomorrow night with an object recognizable as a lampshade-in-progress, it will have all been worth it. Posted by Michelle at 11:57 PM
| Comments (2)
Tuesday, May 20, 2003: Lamp-ish
The mysteries of lampmaking have been revealed to me. Some of them, anyway.
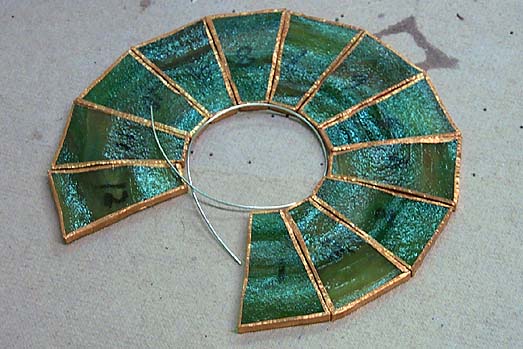
You start off by arranging the pieces of the top tier of your lamp in a nice tight semi-circle. Then you take a piece of twenty-gauge wire and bend it into a curve matching the inner curve of your semi-circle. The idea is to solder wire to the top edges of the foiled pieces in such a way that all the sides of the pieces fit snugly next to one another. When all the pieces are attached to the wire by their top edges, you draw up the wire almost like tying a knot, so that the first and last pieces of the semi-circle come together to make a full circle. Then you play with the angles of the individual pieces so that they create a shallow conical shape. You know that the pitch is right when all of the edges line up with one another. Then, start tack soldering---just enough to hold everything in place. 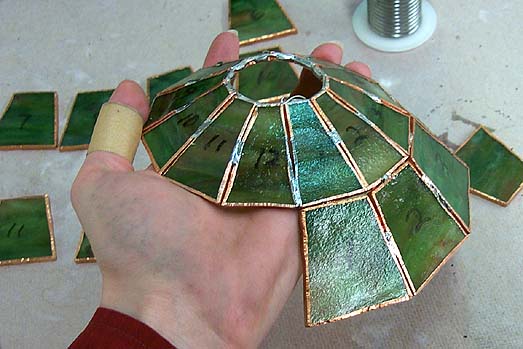
When you finish the first tier, you begin the second by soldering its top edge to the bottom edge of a first-tier piece. Each piece of the second and subsequent tiers will be tack soldered to the piece above and to the piece beside it. 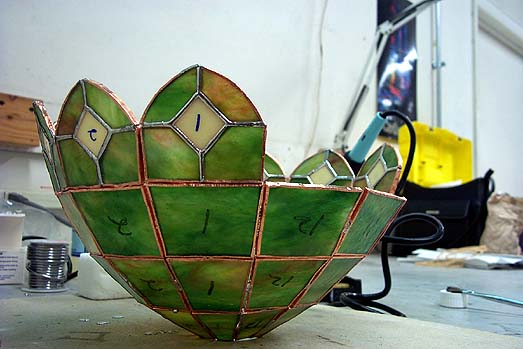
The shape of the lamp comes together amazingly quickly. 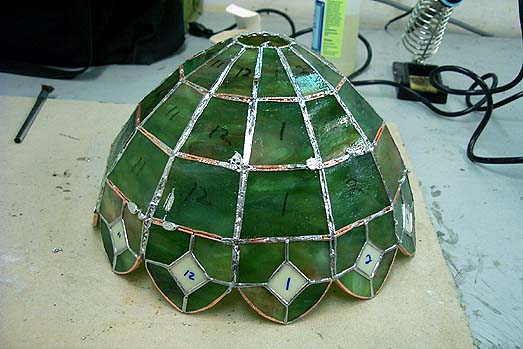
When all the pieces are tack soldered in place, it's time to do a "sloppy solder" on the outside of the lampshade. The idea is not that the solder work should be pretty, but that the lamp will have a good start at a solid construction. Up until this point, it's possible for the tack soldering to break. My lampshade isn't big enough that I have to worry too much about the lamp collapsing inward on itself, but a quick-and-dirty solder of the outside seams makes the lamp strong enough that I can then take my time in making finished, pretty solder lines. 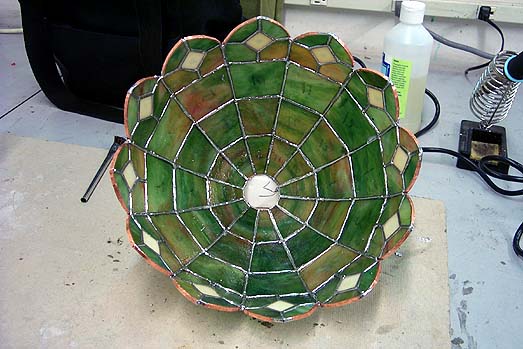
When class ended, I'd done finish soldering on the inside of the lampshade. Nice clean lines. Next class session, I'll apply the outside solder seams and patina, attach a vase cap to the top of the lamp, and do something called "wire-wrapping" about which I know nothing except that everyone in the class who's done it hates it. Posted by Michelle at 07:50 PM
| Comments (8)
Saturday, May 31, 2003: We Interrupt This Program, Part III in a Series
This has nothing whatsoever to do with glass, but the capture of Eric Robert Rudolph is the best thing I've seen on the front page in a long, long time.
I lived in Atlanta when he was so busy setting off pipe bombs there---a couple at an abortion clinic, a couple at a gay club, one made-for-tv explosion at Centennial Olympic Park. I remember every one clearly. I took every one personally. You could deduce from that statement that my social politics are of the leftish sort, and you'd be right. But I'm not too liberal to hope that the son-of-a-bitch is going to fry. Posted by Michelle at 04:40 PM
| Comments (3)
Saturday, May 31, 2003: Parts Is Parts
Went shopping for lamp parts today, one large and one small.
The small one is a vase cap, to be soldered to the top of my lampshade. The store's entire selection of vase caps came only in this brassy color which bears no relation to any stained glass patina known to man. I asked if the vase cap can be patinaed to match the lampshade---still haven't decided what patina I'll use, but will probably go with black. The answer was that the vase cap can be patinaed but will probably want to be tinned first. Tinning, of course, is applying a thin covering coat of solder, i.e.: prime opportunity to burn myself. Watch this space. The big part for which I was shopping today was a lamp base. There are probably people who eschew "store-bought" bases in favor of hand-building something complex and unique, but I feel like I'm doing okay to have built a shade---I don't need to actually build a lamp. I'm okay with that. I found a lamp base I liked, and made it mine. It's pictured below, with the vase-cap-less and yet-to-be-finished lampshade just sort of perched atop the harp of the lamp base, so that I can imagine what it'll look like when done: 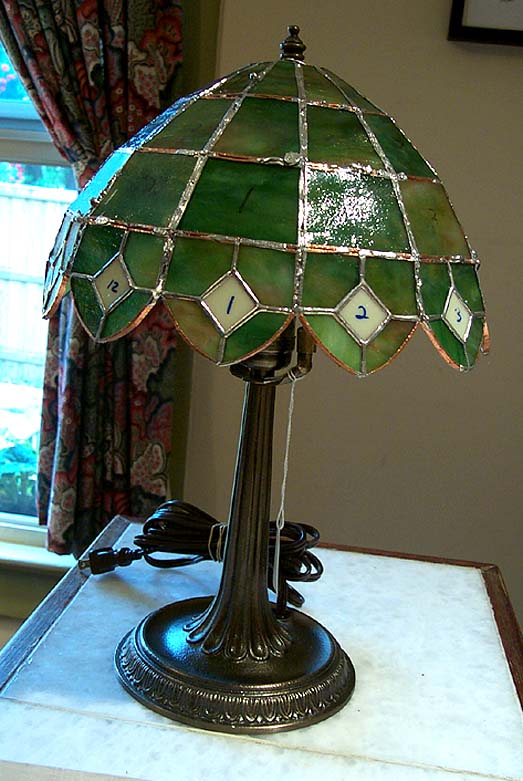
I didn't have glass class this week. We were originally supposed to, then last week, someone in the class suggested skipping Memorial Day's class and finishing a week late. Everyone agreed, which is to say, everyone else agreed and I abstained, seeing the numbers were against me. So the holiday meant I had to wait two whole weeks to do the last couple of hours of work on my lamp. Fortunately (or not) I've been so busy with work that I haven't had time to be impatient about building pretty glass things. Even so: this Monday, I'd better be coming home with a finish-soldered, wire-wrapped, vase-capped, patinaed, polished-shiny lampshade. I have a spot for the finished lamp all picked out and everything. Posted by Michelle at 06:01 PM
| Comments (6)
|
| Copyright © 2002-06 Michelle Kinsey Bruns. E-mail me at my first name at this domain. (Take that, spam spiders!)
|
||