 |
 |
 |
|
I'm learning the art (or is it a craft?) of stained glass. At this weblog, I record progress, note useful links, and document flesh wounds. Links
The Art League
Weisser Glass Studio
Virginia Stained Glass Co.
Warner-Crivellaro
Glass Galleries Links List
The StoreFinder: Stained Glass Store Front
ArtGlassArt.com Tutorials
rec.crafts.glass
Nancy's Beginner Tips and Tricks
Splinter Removal Tips
Syndicate this site
Archives
By Date
November 2006 October 2006 May 2006 June 2004 October 2003 September 2003 August 2003 June 2003 May 2003 April 2003 March 2003 February 2003 January 2003 December 2002 November 2002 October 2002 September 2002 By Project Beaded Unity Candle Crocus Panel Dogwood Windows Green Tiered Lamp Lilypads/Lotus Panel Transoms Xmas Ornament |
 |
Project Archive: Beaded Unity Candle
Saturday, October 18, 2003: Decorative, Affordable Symbolism
Last weekend, I married my very best friend. The day couldn't have been more lovely, and I couldn't be more happy.
The planning of the wedding led to much craftsy creativity on my part. It seemed silly to let other people create things like invitations and programs for me, when I have the technology and the skillz to do so myself. A nice side bonus was the cost savings involved in doing my own stationery: I've driven cars that cost less than our invitations would have cost if we'd sent them out for engraving. Not good cars, but still. From that decision, it was a short leap to tying my own color-coordinated ribbons around tiny bottles of bubbles, and from the bubbles, a shorter leap still to creating my own unity candle when I found out what the average wedding supplier wants you to pay for the average candle-with-a-great-poufy-bow-tied-around-it. Because I used a variety of beads on my candle, and because most of those beads were glass, I have deemed the making of the candle to fall within the purview of this website. Most of the unity candles you see in stores or online are frilly concoctions of white or ivory, often featuring bows, tulle, even Bible verses or other text printed on paper and glued to the side of the candle, then bordered with rickrack. I decided I would like to have my candle color-coordinate with all the other color-coordinated wedding accoutrements, by using strings of wine-colored beads wrapped around my candle in such a fashion as to form diamond shapes, with accent beads at the intersections of the diamonds. First, I collected my supplies: a ivory pillar candle about eight inches tall by three inches in diameter; a spool of 28-gauge craft/beading wire; #18 wire brads; about ten grams of seed beads; and various larger beads for the accents. I would be using skinny craft wire for stringing the beads, then wrap the strings between and around pins or brads stuck into the sides of the candle. The sturdiness of even 28-gauge wire meant that I could give it a wrap or three around each pin on the candle to keep the string of beads taut between pins. It was something more of a challenge to figure out how to keep the strings from just slipping off the ends of the pins. The solution was a happy accident: I found that I had some big beads left over from the making of the Sparklybug which would slip over the shaft of a #18 brad, but not over its head, creating a kind of knob on the end of each brad, to both hide and secure the wire that would be wrapped around behind it. 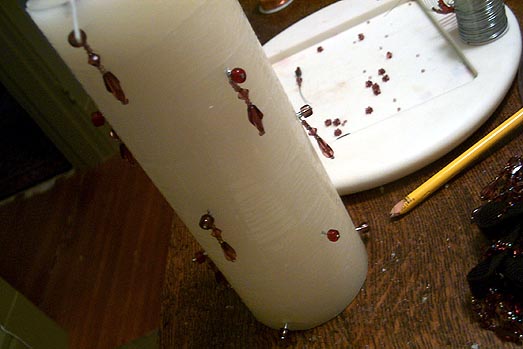
I had a little accident at one point where I pushed a brad into the candle too close to the bottom edge, causing a triangle-shaped chunk of candle to fall out. I probably cursed a lot, but Don saved the day by melting things back together with a lighter. Since then I've heard a recommendation that corsage pins cut down to about 1/2 inch long are a good way to make sure you aren't using pins/brads/nails that are so thick or so long they will cause the candle to break. My 3/4" brads worked okay if I just remembered to not stick them too close to the top or bottom of the candle; of course they would not work for a skinnier candle like a taper. If I remembered anything from any of the math classes I've taken, I could tell you a neat, efficient way to figure out a candle design in two dimensions before committing it to three. But I don't, so I can't. Some sketches and some test candles somehow led me to a plan. I placed my brads on my candle in five alternating rows, at 0/60/120 degrees and 30/90/150 degrees. In other words: one row of three evenly spaced brads, below that a row identical except given a half-turn, etc. Each brad would become a point of a diamond shape created by the strung beads. I left each brad sticking out from the candle a bit so that I'd have room to get the wire wrapped around it later. I tackled the accent beads before moving on to the main strings of seed beads. On short lengths of my 28-gauge wire, I would string just one seed bead, get it positioned at the midpoint of the length of wire, then bend the wire in half at that point to create a double length of wire with a seed bead at its end. Then I strung larger decorative beads over the double wire, about an inch worth. The seed bead at the bottom end kept the other beads in place; I did not trim the extra bare wide from the top end so that I'd have it for wrapping around the beaded brads on the candle. 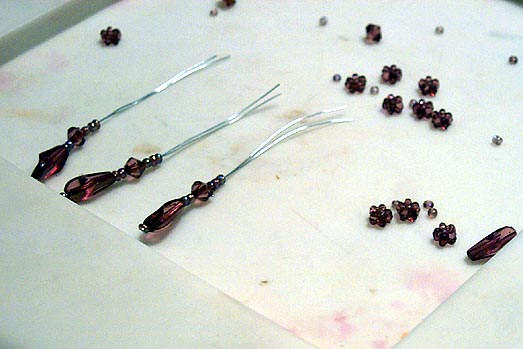
Then came the really fun part. How many two-millimeter seed beads does it take to adorn a seven- or eight-foot length of craft wire? Lots. This task not recommended for anyone prone to vision headaches or fumbly fingers. It seemed easiest to string the beads onto wire that was still on the spool; that way there was only one end that I had to worry about keeping vertical so that all my work would not slide in an orderly line off the wire into a scattered mess on the floor. 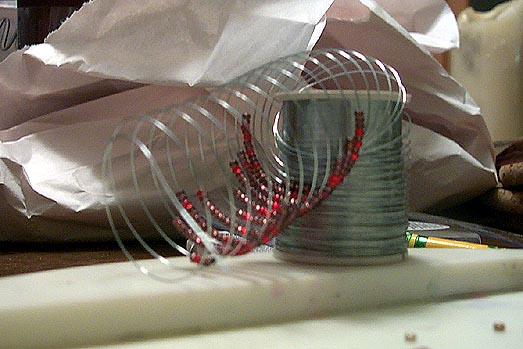
Once I had my long string of beads on wire, I began stringing it from the bead-ended brads on the candle. I began with a brad at the top of the candle, giving it several wraps of bare wire to make sure it wouldn't pull free. Then I brought the wire diagonally down to the right, wrapping it a couple of times around one of the second row of brads, and on like that. When I reached the row of brads at the bottom of the candle, I'd go diagonally up. 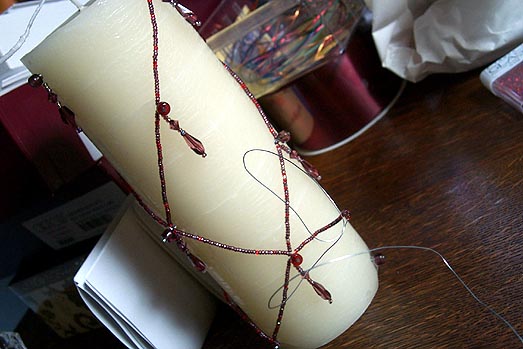
The geometry of the design turned out to require just one long string of beads, zig-zagged up and down and all the way around the candle, until I gave the wire another several securing twists around the same brad where I'd started, then cut the wire (28-gauge can be cut with regular scissors if you don't have wire cutters handy), and made sure its ends were also tucked behind the big bead at the end of the brad. Then I used two shorter strings of seed beads to border the top end and the bottom end of the candle. At this point I went back in and pushed all the brads in as far as they'd go. And then I was done. 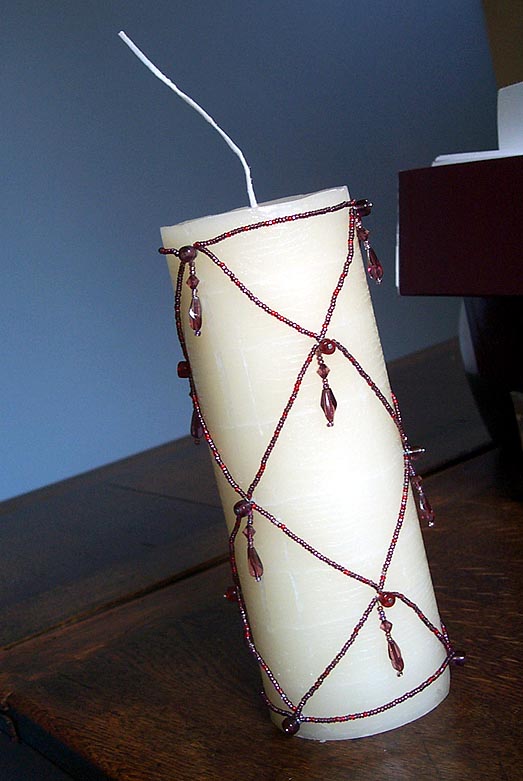
The geometry of the diamond pattern did not come out perfectly, due to a measuring error on my part, and the strings of seed beads aren't always ruler-straight, as the stiffness of wire sort of gives it a mind of its own where shape is concerned. But the thing to remember about a unity candle is that it's going to sit up there on the altar, while all your wedding guests are sitting back there in their pews. So they won't see your slightly off-sized diamonds, or your slightly wiggly strings of beads, or the black smoke marks where your fiance had to melt a chunk of wax back onto the candle it came from. So the candle did its job on October 11, and now it sits in our living room looking pretty, as a handmade souvenir of our wedding. They say the tradition is to burn the unity candle for a little while each anniversary, but I'm not sure we'll end up doing that. I confess to being a little curious to know what would happen when the candle burnt down to a point that threatened the stability of the topmost row of brads, but I'm sure I'd be horrified to actually see it happening. Don, my sweet man, I love you more than anything and everything else put together. I'm so proud and honored to be your very own wife, and so grateful for your love---I would spend eternity stringing itty bitty beads for you, if you but asked me nicely. And for just one of your warm, soft kisses, you could probably even get away with asking me rudely. Posted by Michelle at 03:32 PM
| Comments (13)
|
| Copyright © 2002-06 Michelle Kinsey Bruns. E-mail me at my first name at this domain. (Take that, spam spiders!)
|
||