 |
 |
 |
|||||||||
|
I'm learning the art (or is it a craft?) of stained glass. At this weblog, I record progress, note useful links, and document flesh wounds. Links
The Art League
Weisser Glass Studio
Virginia Stained Glass Co.
Warner-Crivellaro
Glass Galleries Links List
The StoreFinder: Stained Glass Store Front
ArtGlassArt.com Tutorials
rec.crafts.glass
Nancy's Beginner Tips and Tricks
Splinter Removal Tips
Syndicate this site
Archives
By Date
November 2006 October 2006 May 2006 June 2004 October 2003 September 2003 August 2003 June 2003 May 2003 April 2003 March 2003 February 2003 January 2003 December 2002 November 2002 October 2002 September 2002 By Project Beaded Unity Candle Crocus Panel Dogwood Windows Green Tiered Lamp Lilypads/Lotus Panel Transoms Xmas Ornament |
 |
Sunday, December 01, 2002: We Interrupt This Program
A moment of your attention, please.
We---which is to say, Management---have striven from the start of this weblog to avoid tired personal trivia, and to stick to the mission, namely, prattling on about stained-glass craftsy goodness. It's better that way, was the idea, and Management have not been disappointed. But Management are terribly vexed by some social ineptitude on the part of Management's extended social group, and now beg your indulgence while Management offer a lesson in proper party-invitation etiquette. 1.) I am not a girl-shaped accessory of my fiance's. Not even if we live together. Not even if he makes more happy hours than I do. I have my own identity, my own schedule, and my own email address: welcome to the twenty-first century. 2.) Even if I were his accessory, said fiance has this habit of not telling me about parties to which he has been invited and to which he wants to bring me as, I suppose, a date, until it's time to go. 3.) It's embarrassing, people, to have other guests see that I'm not on the evite, and to either ask me why or to have them whisper ostentatiously about your party when I'm within earshot; or to have people not see that I'm not on the evite, and to ask me if I'll be at your house this Saturday, at which point I ask "Huh?" 4.) It hasn't been since high school that I had occasion to sit around going "well, I'm not on the list, but I'm totally a part of the group... aren't I? So I should consider myself invited... shouldn't I? But if I were invited I'd be on the list... wouldn't I? Other girlfriends get their own invitations... don't they?" Maybe I read too much Miss Manners, but all this strikes me as terribly rude. This has happened more than once recently. Which is the only reason it bugs me so, and the only reason I bring it up here. Consider it a public-service announcement: when inviting guests to a party, the "and guest" convention is appropriate only when there is no partner, or you don't know the partner's name, and even then, etiquette demands that you make every attempt to discover it. This becomes even more important at formal affairs, where the old-fashioned etiquette says that if your name (or "and guest") isn't on the envelope, you aren't invited, no matter if you're wife, child, or Siamese twin. The alternatives include hurt feelings, awkwardness, scheduling snafus, overwrought and indignant and totally off-topic screeds on your friends' websites. In other words: drama. You don't want that, do you? ... oh, stained glass? Well, see, winter has arrived, and the basement is not heated, and that's where the workshop is. So. I cut some glass for the transom project last weekend and then I got cold and then I vowed to buy a space heater. At some point. Is the plan. Posted by Michelle at 03:59 PM
| Comments (7)
Monday, December 09, 2002: Back in the Saddle Again
After having taken most of a couple weeks off from stained glass and pretty much everything else, due to bronchitis and sinus infection, a mysterious hand injury, a cold basement, and a giant pile of fence pickets (courtesy Don) blocking my access to the workbench, I put my copy of The John Lennon Collection on the stereo, cranked it up, and got back to work today. I've cut 14 of 17 pieces of one transom, and touched up 11 of those with the grinder. A lovely thing about this design is that it's horizontally symmetrical, so I can flip my pieces over so as to see the glass rather than the bits of pattern paper stuck to them, and still have them fit (more or less) on my building pattern.
I have been using correspondent Bruce's dowel trick for breaking very long straight lines in glass. Works like a charm, and I'm glad he shared it with me. Besides being very effective at keeping the break on the score, it's also a hell of a lot safer to break a big piece of glass when it's lying flat than it would be to do it with running pliers. I'm not having so much luck with tapping. It's said you can control a tough break by first scoring as normal, then turning the glass over and tapping the end of a glass cutter on the underside of the the score to create and then slowly extend a crack along the score line. I've tried it once, on a score too long to trust to running pliers, too far from the edge of the glass to use breaking pliers, and too curvy to rest atop a dowel. My result was a nasty crack through the middle of my piece, which necessitated slow and careful scraping of the pattern piece from the glass using an X-acto knife. Which is SUCH a pain in the ass, takes forever to get it off the glass intact. Grunt work, and the best argument I can think of for cutting glass by tracing it out on a lightbox instead of using paper patterns. My deep dark secret is that I'm not 100% sure my transoms are buildable as I have designed them. Well---not by me, anyway. The first challenge in my pattern is that the orange pieces of the flower-shape sort of notch into the clear glass at their tops, a little bit. It's a challenge because you wouldn't be able to cut a notch out of a piece of glass without breaking it---unless you had four hundred bucks to drop on a ring saw---so I'm relying on the 1/4" supplementary head of my Glastar SuperStar II grinder to create a little notch for the glass to slide into. Just due to the nature of the tool, it won't be able to do exactly what I have designed into my pattern, so some on-the-fly fitting will be required once I get to the point of leading everything. Should be fun. Here's hoping I can make it work. The 1/4" grinder head was a little scary to use for the first time today. I set up my mini table so I had a support surface for my glass at the height of the 1/4" head, and all that worked fine, but when I actually started using it, the grinder head seemed loose. It wiggled some, and too much pressure on the glass against the head would cause the head to try to sort of grab the glass and shoot it at me. When I stopped and removed the mini table, I found that a tiny sort of screw which holds the 1/4" head to the top of the 3/4" head had loosened to the point of falling out when I lifted the 1/4" head. I cannot imagine how. Vibrations from the grinder, maybe? But that's what a grinder does, is vibrate. I'll have to keep an eye on that little screw. Projectile grinder heads are not one of the risks I bargained for when signing up for this little hobby of mine. A very merry Christmas And a happy New Year Let's hope it's a good one Without any fear Posted by Michelle at 08:37 PM
| Comments (1)
Thursday, December 12, 2002: For The Art Collector Who Has Everything
Friend Norton sent along a photo of a Frank Lloyd Wright prairie-style double-pedestal stained glass lamp that sold at Christie's for nearly two million dollars on Wednesday. The price is said to be an artifact of the lamp's historical value. Which makes more sense than anything having to do with its aesthetics. Just because I've prattled on in the past about the genius of Frank Lloyd Wright doesn't mean I actually like his stuff.
Don and I were at Arise Gallery in Takoma Park the other day, and why a vast warehouse full of Asian furniture, housewares, and clothing would contain a coffee-table book about Frank Lloyd Wright's architectural glass is beyond me, but it did, so I paused for a thorough browsing. I was unable to find a single photo of any art glass I would wish upon any house of mine. No accounting for taste, I guess. We did spy, at Arise, some interesting wood-and-stained-glass freestanding folding screens. The only problem was, the glass in these screens was of a very regular sort of fleur-de-lis type pattern, which made it glaringly apparent that the glass had been cut and set crooked. My instinctive reaction was, "I could do better than that!" ---I really need to watch that, it's gonna get me in trouble one of these days. Posted by Michelle at 11:43 AM
| Comments (7)
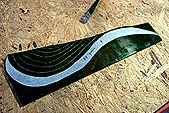
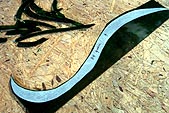
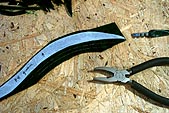
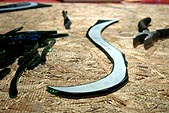
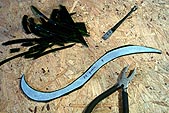
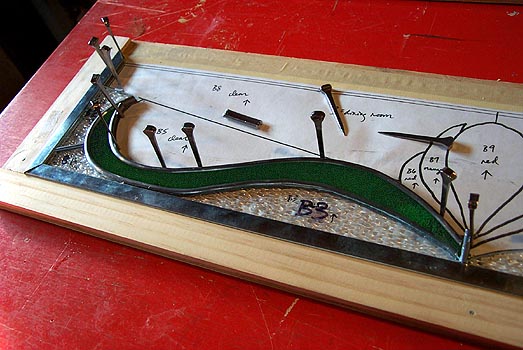
Friday, December 13, 2002: The Making of an S-Shaped Sliver: A Picture Essay
Not pictured: fucking up one's second green S-shape, halfway through breaking out its first inside curve. You didn't need to see that. Posted by Michelle at 12:28 AM
| Comments (0)
Friday, December 13, 2002: Ain't Playin Around
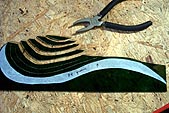
All seventeen pieces of my first transom are cut and ground. I had thought at first I'd build all three transoms at the same time but then I thought that perhaps it would be a good idea to build a first one as a proof-of-concept.
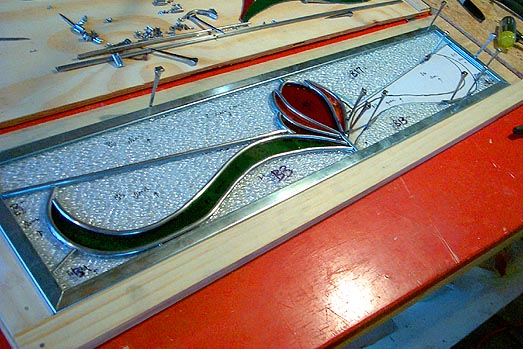
So far, it's looking more or less as I had planned: 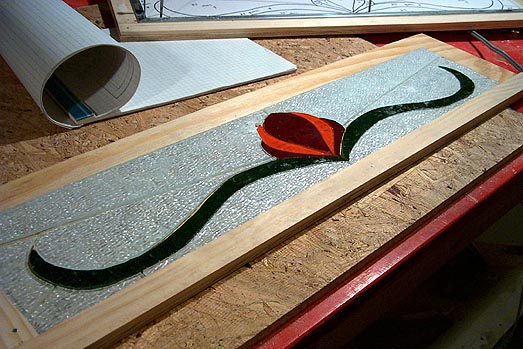
In this picture, all the pieces are reversed so that you can see the glass rather than just the pattern paper which is still glued in place. The next step will be the soaking off of my pattern pieces, and after that, the leading begins. And soon. Don, feeling some antsiness due to the winter weather that has kept him away from his half-built picket fence for some days now, is taking out his frustrations on our transoms. He took down one of the old ones of plain window glass a couple of nights ago, and after studying it thoroughly, has come up with a proof-of-concept of his own for the construction of the frames for my new transoms. 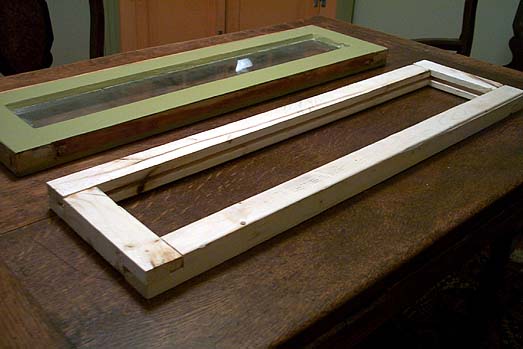
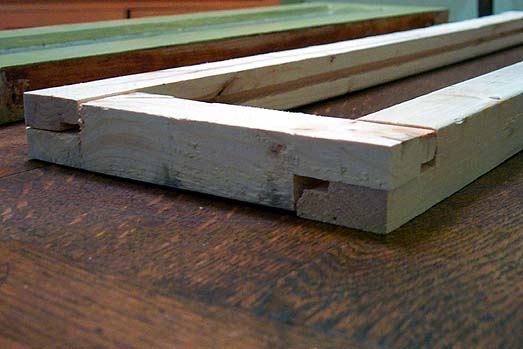
This is, apparently, what heaven looks like to a guy with a brand-new table saw. You can see a sweet little groove all around the inside of the frame pieces, where the stained-glass panel will just slide in nice and neat-like. A little bit of skinny weather-stripping on the insides of the grooves should provide some insurance against the panel's rattling around in the frame. You can also see that Don has a sort of pinwheel construction going, with each of the four sides of the panel being notched above on one side and below on the other. I have been going on and on about how the frames need to be able to come apart in the event of some tragedy necessitating repairs to the stained glass, so I think his plan is to drill screws in through the overlapping notches at each corner. Should be good and sturdy. When I have some glass to put in there, that is. Discussion is ongoing with regards to how to affix the transoms to their frames in the door jambs. The hardware for the old transoms is just a pair of sort of spring-loaded metal pins set through the vertical sides of the transom frames; the pins serve as both mounting and swiveling mechanisms. But even if I could find those neat little pins on any restoration hardware site on the web---and oh, I looked---they won't work for the new transoms. The zinc frame of the stained glass panel will take up much more of the total depth of the transom than the old window glass did, leaving not enough room for swivel pins. So, with the help of the Van Dyke's catalog, we're looking for some nice little hinges and chain, maybe. Or maybe something else yet. We're not sure. Stay tuned, though. Don's all hopped up to do this thing, so now it's no longer my project but rather our project... I dunno, something tells me the schedule just got moved up considerably. Posted by Michelle at 06:02 PM
| Comments (3)
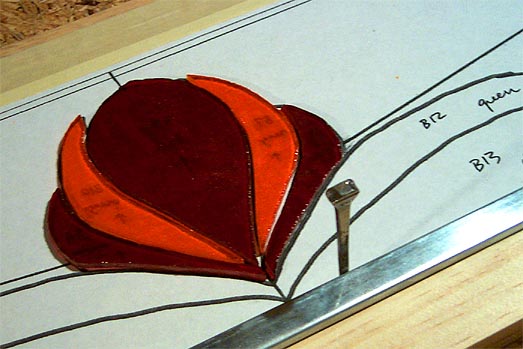
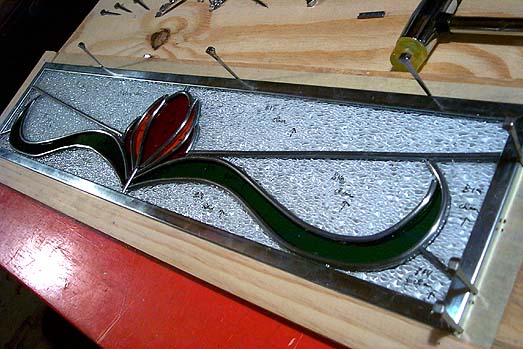
Friday, December 13, 2002: Pictures Can Lie, and Do
You might think, from the photograph below, that I had gotten off to a good start in leading my first transom.
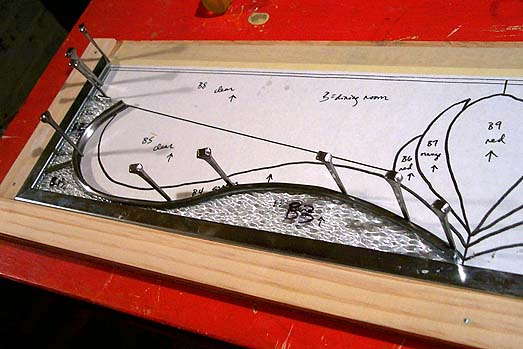
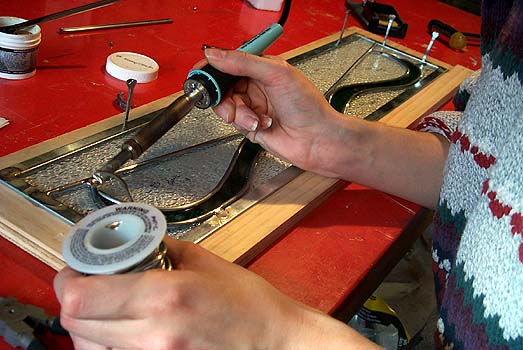
You would be wrong. Turns out that the green S-shaped piece that slides in next to and above the three clear pieces in the photograph is a bit too S-shaped to really want to slide in there properly. It was (is, will be) tough to slide the S-shaped piece firmly into its slot, because its shape and the shape of its neighbors means I can't just slide it in from the side or from above, in one smooth motion. Really I think that instead of fixing in place one piece at a time, from the lower-left corner of the panel inward, I'm going to have to sort of puzzle the first four pieces together as a discrete unit and then fix that into the corner of my workboard. As far as I can tell, such a trick would require me to have about five hands, but I'll worry about that later. I resigned myself to this eventuality only after a lot of futile pushing of glass and bending of lead which resulted in my breaking piece B3, the widest clear piece pictured above, across its skinny panhandle, where the piece is almost entirely swallowed by the channel of the zinc frame. There is some optimism to be had, however: unlike with my last (first) panel, when I soaked the pattern pieces off my cut glass, I did it so that they could be removed in one piece. Three cheers for pattern paper with a waxy, somewhat water-resistant coating. So at least I still have my original pattern piece for re-cutting. Far preferable to having to trace out a piece from a building pattern the accuracy of which was suspect from the start. I'm going to have to figure out how to bend lead to fit a curvy piece of glass without putting undue pressure on the glass itself. That's how I broke B3 up there, and I broke a piece of glass on my crocus panel that way too (though not so noticeably that I didn't just pretend it didn't happen and keep on with the leading). A big challenge. If I knew how to work a jigsaw, I could perhaps create a wooden template in the shape of a curvy glass piece, and bend the lead around its edges. I mean, it'd be a pretty high-maintenance solution, but worth it maybe for glass pieces so skinny or so curvy that bending lead around them is just asking for trouble. Or maybe I should just stick to 5/32" lead until I'm better at all this. My plan for the transoms is to use 1/8" lead for the cut lines and 3/16" lead for the lines of the design proper. Those sizes are only 1/32" smaller and larger, respectively, than the lead I used in the crocus panel, but the difference in the way it feels is huge. The 1/8" lead is so soft that (I know now) it's possible to actually break it while stretching it out, and so soft that once it's stretched it keeps wanting to bend again; the 3/16" lead is harder to cut and harder to bend and probably contributed to tonight's problems. I need to keep in mind that I'm still a huge newbie, that this is only my second piece, that to get discouraged at this stage would be basically pretty arrogant. All the differences between the crocus panel and the transoms make for a lot of room for mistakes, but each one adds something to my knowledge of stained-glass construction. That's what I'm telling myself. In between telling myself, "Self, you're such a clumsy cow." Speaking of. I got through cutting and grinding all my glass without too much bloodshed, but for some reason I kept spouting tiny crimson leaks from my hands tonight when I wasn't looking. They were all such superficial wounds that there was no pain---the issue instead is, when you're working with the lead came, you can see black lead residue rubbing off on your hands. It looks like newsprint smudged onto your palms after a studious read of a fat Sunday edition. Generally it can be washed off without a problem... but when your hands are both sooty with lead and dotted with bleeding nicks, you do begin to feel a little bit of concern for your long-term health. Posted by Michelle at 09:39 PM
| Comments (0)
Sunday, December 15, 2002: Gloat While the Gloating's Good
It turns out that the trick to seating the long squiggly green piece properly was to, well, cheat. I slid the zinc frame bordering the panel on the left off the workboard, so that I could slide piece B2 up and out of the construction, so that I could bend back the uppermost end of the long curve of lead, so that I could slide the green piece straight down into its curve from above. Then put back the stuff I'd removed. And now all these pieces are tight. I mean, there's not even the slightest sliver-gap of space showing between lead and glass, there at the lower edge of the green. SWEET. Long curvy lines are so tough to lead and to fit---it doesn't look like I've accomplished much since the last photo, but still I think this is a good stopping point for now, so that I can walk away from it feeling competent and clever, for a change. Posted by Michelle at 02:33 PM
| Comments (0)
Thursday, December 19, 2002: Slow but Steady
Most of this week's expenditure of creative talents has been allocated to the artful wrapping of Christmas gifts (and to the not-so-artful shopping for them, but that's a whole other thing). I have, however, been working on my transom , in fits and starts, during brief spells of otherwise-unclaimed time.
I've got thirteen of seventeen pieces in place right now, but the way I'm having to build this design out, that number is so variable, upwards and downwards, as to mean not a whole hell of a lot. I'm having to do a lot of placing one piece in order to lead an abutting piece, then taking out one of those pieces in order to be able to slide in a piece somewhere else... it's like one of those plastic puzzle grids that used to be given out as children's party favors, where all the sliding numbered tiles would be jumbled out of order and you were to fix it using only the single empty space on the grid and your wits. 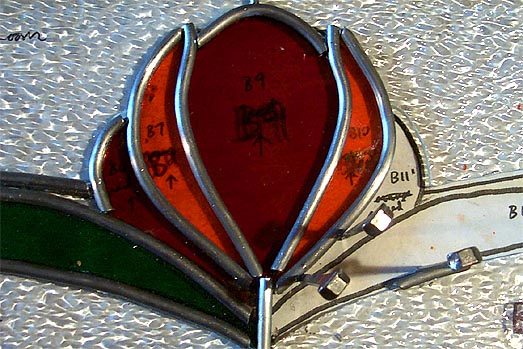
Like this here. After I've finished laying down the flower shape, the big clear piece in the upper right will have to be pulled out again, in order for me to fit in what's left. But for now its presence is crucial to shaping the flower. I am learning about the difficulty of true symmetry in stained glass. It's not that it can't be done, I imagine, it's just that you'd have to be a hell of a lot better than I am. Still, I'm close enough to pattern that I think once the piece is installed, no one will see the asymmetries unless they're looking for them. And I have high hopes for being able to smooth over some of these rough spots during the soldering process. Like that vertical line at the bottom center of the flower shape---right now it's a little loose and a lot crookedy because of the difficulty of getting all the glass to fit snug together in a spot where so many pieces meet---but I can solder it in straight and then all will be well. Speaking of tricks for hiding flaws, I decided this week to ditch my idea of leading the transoms in 3/16" and 1/8" lead. The 1/8" is just too skinny to work with. The wider the face of the lead, the more you can get away with in terms of hiding the edges of a slightly wiggly "straight" line or other cutting/grinding flaws, and I'm discovering I need the forgiveness of wider-faced lead. So it's all 3/16" from here on out. The eighteen or twenty-four feet of 1/8" came I've got in the basement is gonna be there a while, I suspect. Posted by Michelle at 01:49 PM
| Comments (4)
Friday, December 20, 2002: Having Leaded
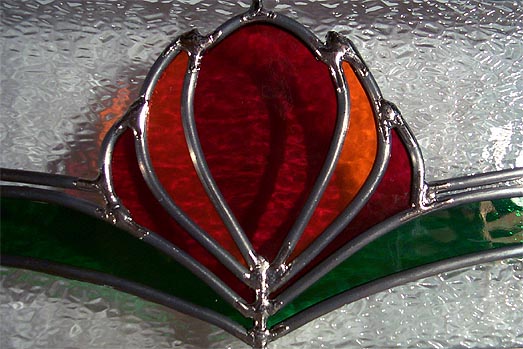
Finished the leading on transom number one last night. Was really, really surprised to have it go as well as it did. I didn't tell you about the night earlier this week when I not only broke one crucial, difficult piece, but also broke about three of its replacements in their cutting, before finally managing to produce a whole one. Part of me was expecting the corresponding pieces on the right side of the transom to behave just as badly, but no. Plus, bending the lead into curves went much better on the right side than it did on the left, too. I hope my good fortune will hold when I start soldering today. I've mentioned before that the stained glass class I took in the fall focused on mechanics as opposed to design, but one design pointer we were given was not to design pieces where a whole bunch of lead lines converge, as that is an excellent way to end up with an unsightly lead blob at that place. This is advice I totally ignored in the designing of my transom, so it will depend on luck that I not end up with a craggy, leaden mountain range at the base of my flower shape. Posted by Michelle at 10:34 AM
| Comments (3)
Friday, December 20, 2002: Flux, Solder, et Voila

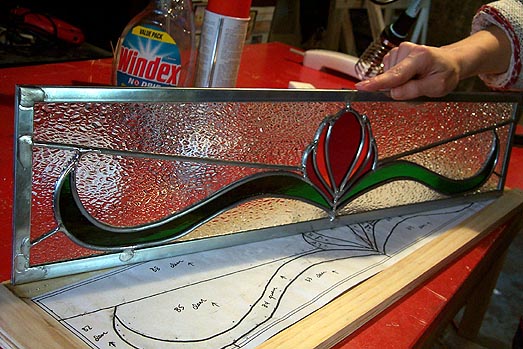
And it's not even too blobby. Next up: soldering the other side. This thing is starting to look like a transom. Posted by Michelle at 04:29 PM
| Comments (2)
Saturday, December 21, 2002: Now the Messy Part
I've soldered both sides of the transom. Now to go outside and take advantage of what's left of a lovely sunny warm-ish day by puttying in the autumn-like breeze. Posted by Michelle at 03:08 PM
| Comments (4)
Wednesday, December 25, 2002: Introducing the Fisher-Price My First Stained-Glass Christmas Tree Ornament
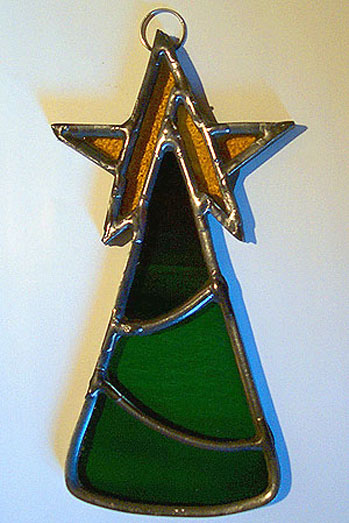 I built this ornament (about five inches tall) this week from scrap glass, skinny lead that I'd decided not to use on the transoms after all, and some U-shaped lead for the edges. I am aware it came out all crookedy, but I prefer the term "experimental." I built this ornament (about five inches tall) this week from scrap glass, skinny lead that I'd decided not to use on the transoms after all, and some U-shaped lead for the edges. I am aware it came out all crookedy, but I prefer the term "experimental."
I drew the pattern freehand on a legal pad, and didn't bother with a duplicate building pattern, though in retrospect I think I ought to have. Putting it together was interesting: no straight edges meant that I couldn't build out from a corner the way you would a rectangular panel, so this was another of those situations where having about five hands would really be the best way to deal with it. Working with U lead (for edges, instead of H lead for interior seams) was fun, actually. It's easier to cut than H lead, but it was an absolute bear to stretch---my lead stretching clamp just didn't want to grab on to the came. The big challenge with this ornament was in leading the pieces of the star that have the small triangles attached to their sides---it's one line visually, but for construction, it needs to be U lead for the edge, then H lead to hold the triangle, then U lead for the edge again. The challenge was to join the three pieces of lead to make one relatively straight line, preferably not too uglified by great globs of solder. I also played with finishing compound for the first time on my ornament here. A word to the wise: when they say to buff with a soft cloth, they mean a really soft cloth, if you patinaed. The silly part of all this is, you'd really want to do a little, funny-shaped ornament like this using copper-foil construction, not lead came. But I only know how to do lead came, for the moment, and so that's what I did. All in the name of scientific inquiry. Tonight I gave the ornament to Momma Bastard. I told her that I'm not sure whether or not it will have all fallen apart when she unboxes it for next Christmas, but that if it does, I'll make her another one. Hopefully by then in copper foil, which will help it look less like kindergarten stained glass, and will be sturdier too if it's funny-shaped like this one. Momma Bastard was very gracious about my smushed-looking star, I am pleased to report. Next year's ornament gets a building pattern. Definitely. Posted by Michelle at 10:13 PM
| Comments (4)
Wednesday, December 25, 2002: Squint and Pretend
While I've been playing on the computer tonight, Don has been his usual industrious self. He spent the evening in the basement with the table saw, working out a plan for frames for our transoms. He is not quite there yet, but tonight he produced a test frame that was close enough to right to let us prop up the transom in the door frame to get an idea of how it will look:

Sweet. To bring the record properly up to date, I did get the transom puttied, cleaned up, and spot-patinaed over the weekend. A nice thing is that the wooden frame of the transom will hide the zinc border of the stained glass panel so I don't have to worry about patinaing or polishing it. So the transom panel is finished, just waiting for its pretty wooden frame. There are two more to build, though, so I'm not doing the finished-my-project dance quite yet. Posted by Michelle at 11:16 PM
| Comments (7)
Thursday, December 26, 2002: WITHOUT LIGHT TABLE I WOULD BE LIKE A BLIND PAINTER.
In a thread at Glass Chat on the topic of glass for reproduction Tiffany lamps, I found a link to an amazing photo essay on the construction of a 22" Tiffany tulip lamp by a glass studio in Essen, Germany.
A million photos show just how much work goes into one of these mammoth lamps. Hans-Peter and Gudrun did it in two weeks. One day I'd like to build one of these, but not for a long time... and even then, I have a feeling it'll take me a hell of a lot longer than that. Posted by Michelle at 09:35 PM
| Comments (0)
Saturday, December 28, 2002: It's That Time Again
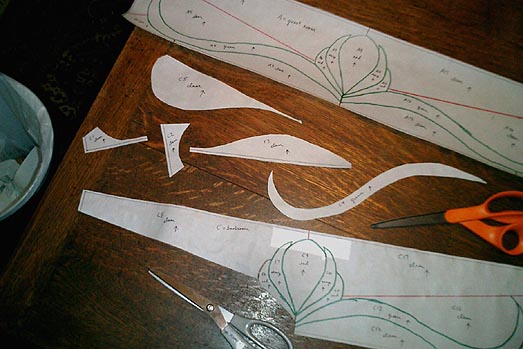
Time for cutting up little scraps of pattern paper. Spied at the drugstore tonight a bag of ten "non-latex" gloves, and made them mine, thinking of the havoc wrought upon my hands last weekend in puttying the first transom. Hot water only turns the putty residue on your hands into sticky black grease; it does come off with Dawn but then I wonder if accumulated putty in the kitchen drains can really be a good thing. Hence, disposable gloves. The above photo and the recent one of Don testing the fit on one of his wooden transom frames were taken with my new toy, a leetle tiny Casio digital camera. Love it; it's vastly smaller and quicker than my old Kodak DC290. It won't replace the more powerful Kodak, but I can turn it on, take a volley of photos, and turn it off again in the same time it takes the Kodak to wake up, so I believe the Exilim may now be the official camera of this weblog, except for timelapse tripod shooting. Only (tiny) problem: its photographs are at a different aspect ratio than those of the DC290, which might require a little bit of adjustment on my part, if not an out-and-out revision of the Adventures in Dangerous Art unified graphic sizing standard. It's turbulent times, I know. Posted by Michelle at 01:23 AM
| Comments (0)
|
|||||||||
| Copyright © 2002-06 Michelle Kinsey Bruns. E-mail me at my first name at this domain. (Take that, spam spiders!)
|
|||||||||||