 |
 |
 |
|||||||||
|
I'm learning the art (or is it a craft?) of stained glass. At this weblog, I record progress, note useful links, and document flesh wounds. Links
The Art League
Weisser Glass Studio
Virginia Stained Glass Co.
Warner-Crivellaro
Glass Galleries Links List
The StoreFinder: Stained Glass Store Front
ArtGlassArt.com Tutorials
rec.crafts.glass
Nancy's Beginner Tips and Tricks
Splinter Removal Tips
Syndicate this site
Archives
By Date
December 2006 November 2006 October 2006 May 2006 June 2004 October 2003 September 2003 August 2003 June 2003 May 2003 April 2003 March 2003 February 2003 January 2003 December 2002 November 2002 October 2002 September 2002 By Project Beaded Unity Candle Crocus Panel Dogwood Windows Green Tiered Lamp Lilypads/Lotus Panel Transoms Xmas Ornament |
 |
Project Archive: Transoms
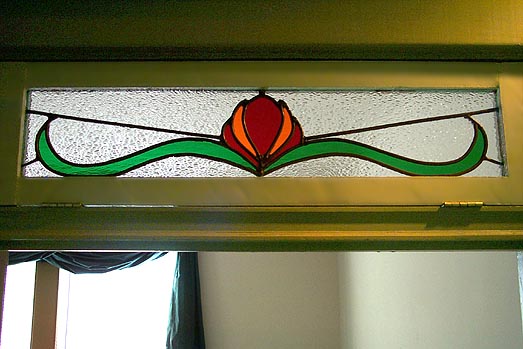
My second stained-glass project (and first independent one) will be to build three transoms for the hallway of the bungalow I share with my sweetie Don... or maybe four if I get really ambitious and decide the one from the kitchen to the mud room is worth doing too. I expect I'll finish in January or February of 2003. Sunday, November 10, 2002: Sic Gloria Transom
Now that the crocus panel is all but finished, it is time to turn my attention to the transoms in the hallway of the bungalow I share with my sweetie.
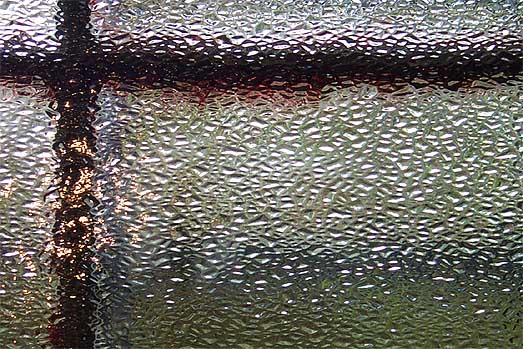
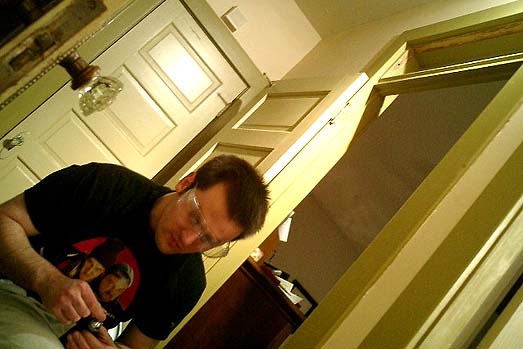
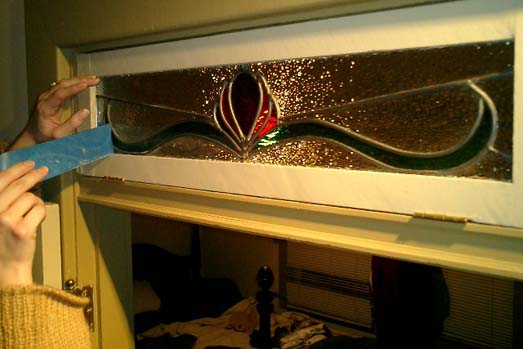
There are three in the center hallway downstairs, over doors to the bathroom, the guest room, and the dining room. Here's a "before" photo of the first two: 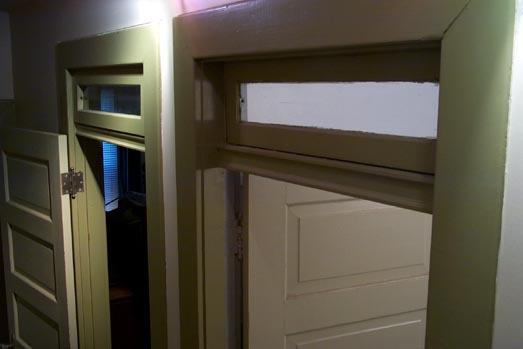
The other is across and down the hall so doesn't fit in the picture. But it's more of the same. There's also a transom over the back door in the kitchen, leading out to the mud room. It's sort of a mess---the last owners of the house, I believe, wanted to make sure that that transom would never open again, so its short ends are covered over outside with little ends of lumber, and then painted closed with a vengeance. Plus, there isn't a light in the mud room, so if that transom were replaced with pretty stained glass, the pretty stained glass would not be shown to its best advantage. So I might just skip that one entirely. I'll do the three in the hallway and see how I feel then. I dragged a bar stool up and down the hallway to stand on as I took measurements of each transom. In case I lose the scrap of paper on which all this data is recorded: 28 3/4" by 7 7/8" over the guest room and dining room; 26 3/4" by 7 7/8" over the bathroom; who the hell knows by 7 7/8" over the mud room. The transom in the bathroom was also painted shut. It took about twenty minutes of hacking with my five-in-one tool to finally loosen the transom so it would swivel freely, and I made the Devil's own mess doing it. 
I was feeling awfully handy by the time I finished freeing the transom. I don't think it's swiveled on its pins in years and years. Now that I have good measurements, I'll bust out some graph paper and start making some drawings, see if I can come up with something my sweetie will like. It's the dreaded comp-approval phase of the project, except if this client gets too micromanagerial about the lovely transoms he'll be getting, pro bono no less, I can call him a finicky bastard, tell him to get lost and go cook me something nice for dinner. I sort of hope it happens, actually. Posted by Michelle at 03:48 PM
| Comments (0)
Monday, November 11, 2002: Ladies and Gentlemen, We Have a Winner
Fastest. Comp phase. Ever.
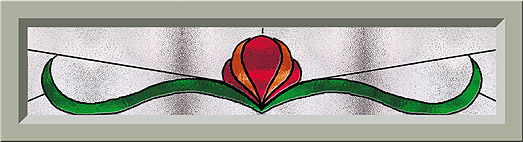
It started off as a freehand drawing and then was finished in Photoshop. Yes, I did take that Illustrator class last month, but I have not yet seen fit to actually spend four hundred dollars on the software, so. Challenges or experiments I have built into this project include: working with clear textured glass; using two widths of lead came (3/16" for on-purpose edges, 1/8" for "cut lines" where edges only exist for the purposes of making the project buildable); building with the intention of adding a wooden frame around the panels themselves; tweaking one design to create two end products differing in width by two inches; working with individual pieces up to 14" long; ordering glass sight-unseen from Warner-Crivellaro because Virginia Stained Glass had absolutely nothing that looked appealing for any of the colored glasses when I went scouting for materials today. The nice people at Spectrum Glass deserve a shoutout for putting big, photographic, eminently usable color chips of all their glass on their website. I've been swiping those images for use in defining Photoshop fill patterns, so all the glass colors/patterns in the image above really do exist... I'll just order what I used to do the comp, and quite likely learn a little something about their chips + my monitor vs. real life. A small gamble, but I like the colors I ended up with a lot, and I know that Spectrum glass is one of the easiest kinds to cut, so I'm sold. The best thing about this design? It's only 17 pieces. Times three is 51... which is still 18 pieces less than my crocus panel was. I'm hoping this means that construction will just fly by. You might think that simply shopping for glass would be an activity which would not result in flesh wounds. You would be wrong. I have two or three fresh hairline cuts on my right hand, incurred by just flipping through sheets of glass in the bins. Can't see em, but I sure can feel 'em. Posted by Michelle at 05:57 PM
| Comments (7)
Wednesday, November 13, 2002: Buying Spree(s)
Yesterday I went to Weisser Glass Studio in Kensington again. It was mainly for one thing---1/2 inch zinc framing, of which Virginia Stained Glass seemed to be out, and which Warner-Crivellaro won't ship unless you order 12 of the six-foot strips. I thought that while I was there I'd also look to see if they might have any of the colored glasses I had picked out for my transoms. I was hoping, in particular, to get lucky with the green glass... I needed sheets at least 12.1 inches wide on one side, and anyplace I could find it online sold only up to twelve inches, give or take an eighth. So close yet so far.
Lo and behold, Weisser had everything I needed. Giant sheets of green glass, plenty of the red and orange too. Also the zinc. Also the lead. (I swear I have good reasons for having designed the transoms to take all different sizes of zinc and lead than any I happen to already have in the basement.) I said before that Weisser was tiny but jam-packed with a ton of glass. Must reiterate that sentiment now. I was very pleasantly surprised to find everything I needed there---I don't think that shop is fifteen feet wide, but wow. Between their glass selection and the fact that Virginia Stained Glass seems to be constantly out of several sizes of lead and zinc, I'm thinking it might be prudent to start hitting Kensington first instead of Springfield for my supplies from here on out. At the very least I'll be updating my sidebar over there. Momentous and historic, right? Forthwith, photos of all my glasses, including the clear sparkle glass, which I did buy at Virginia Stained Glass. The two sheets of clear and the one of green are all between two and three feet on all sides; it's sort of scary carrying around sheets of glass that big. 

Posted by Michelle at 01:58 PM
| Comments (4)
Thursday, November 14, 2002: Tracing Transoms
To Kinko's today, to output my transom patterns and then scale them up on the Oce oversize copier. Brought them home for tracing onto pattern paper, to find that one end of my Oce print sort of droops. The horizontal lines on the Oce print match up to the grid on the paper pattern just fine... until the last two or three inches when suddenly everything slopes down, ending up probably 3/16" off-kilter.
My instructor was saying weeks ago that he generally takes his patterns to a place that does blueprint copies for duplication, in case a "regular" photocopy should be off. "Gosh, that sounds like overkill," thought I. Another lesson learned. Having to compensate for the rogue slope makes it even more nervewracking than necessary to try to do two identical but separate traces of the same pattern. Also nervewracking is the need for maniacal lead-line precision with this piece; there's places where lead will abut lead, or lead will abut the zinc frame, which means more or less zero room for error in cutting the glass around those places. I wonder if there's a manufacturer of precision-tip permanent markers out there? Being able to draw in strokes the exact widths of 3/16" and 1/8" lead would make the fine-tuning much easier, if scarily encouraging of one's anal-retentive tendencies. And speaking of drawing in precision-width strokes, they are The Number One Reason Why Photoshop Is Clearly Inferior To Illustrator For Purposes Of Stained-Glass Patterns. I decided last night I wanted to change my Photoshop pattern file to reflect true widths of all my lead lines... bwahahah! For the keenly observant---if this looks like a pre-supplied excuse for failure ("It's Photoshop's fault, man!") if construction goes badly, that's because it is. 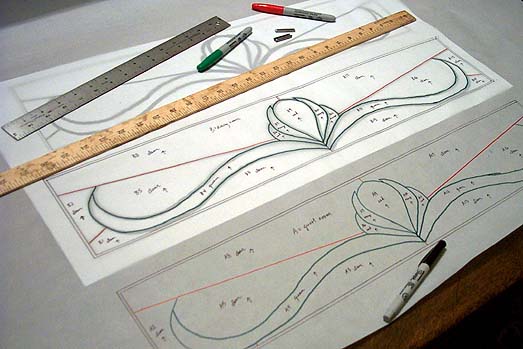
Posted by Michelle at 11:00 PM
| Comments (0)
Saturday, November 16, 2002: Fun with Scissors
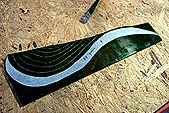
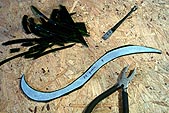
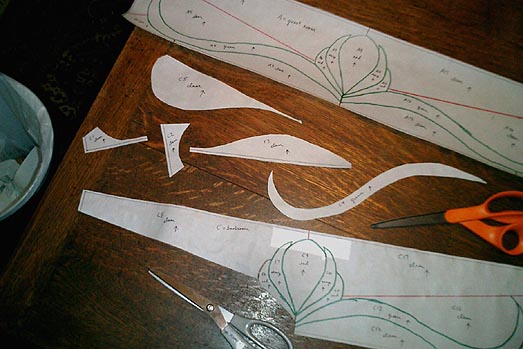
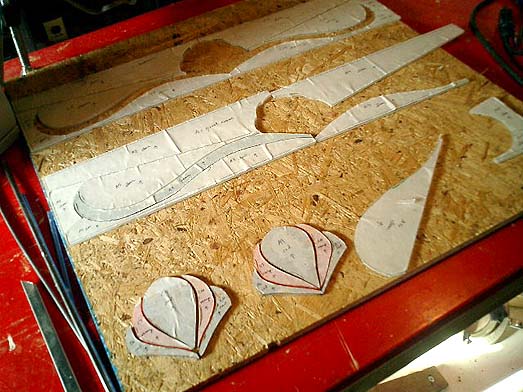
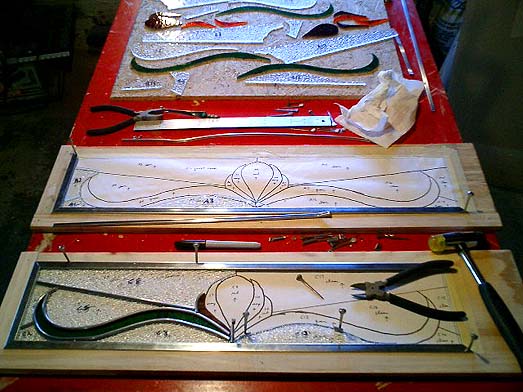
Cut up one of the patterns for my transoms today. Just one. It would be more efficient to build all three simultaneously, but until I know for sure that I can successfully cut and lead scary pieces like this---
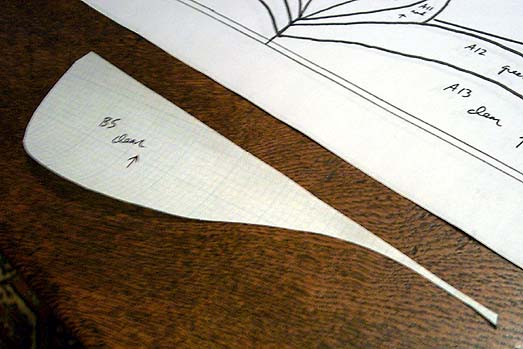
---one transom at a time seems like a good idea. With the crocus panel project, I realized that it really is a good idea to try to cut precisely along the lines of your pattern. I had assumed that it wouldn't matter so much, as the pieces would fit together regardless. While that's true as far as it goes, it also means that building the piece on top of a building pattern is less of a help than it could be---optimally, you're using it to make sure your glass cuts are as they should be, which you really can't do if the lines on the building pattern bear no relation to where you cut your original pattern. Also, as it was my sad fortune to discover, if you end up breaking one of your glass pieces at some point, it's very useful to know that your building pattern will be pretty accurate for tracing out a replacement. So I cut up my pattern very slowly and very carefully tonight. My goal was to cut out with the pattern shears nothing but the red and green Sharpie lines which represented the edges of all my pieces. I am pleased with the results. 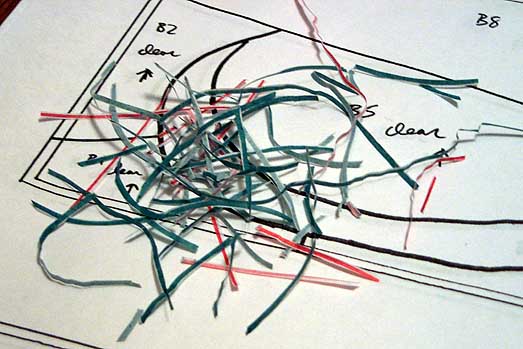
More building pattern inefficiencies: I took my original, pattern-paper pattern to a different Kinko's to use a different Oce oversize copier than I did to blow up my one-third-sized Photoshop comp the other day. You will remember that that first Oce introduced a slope in my nice straight lines at one end of my patterns. Well, there was no slope in the product from the Oce I used tonight, but it did give me a copy about 1/16" too long on the x axis, though the y was fine. For future work which needs to be installed into existing spaces, I'll definitely be looking into blueprint duplication so I don't have to deal with inaccuracies introduced by crappy Oce copying. ---Actually, Oce probably makes very fine machines, but experience tells me that anything you put into a Kinko's for public use is going to be beat to shit before long. I've got a crampy, stiff right hand today---must stop sleeping on top of my arm---so there's no way I was going to get any glass cut. But I did fit a building pattern and some zinc frame to one of my workboards, for which I bought wood earlier in the week, no thanks to those employees of Home Depot who apparently catch the short bus to work each morning. I must admit, it's sort of exciting to see the pattern all laid out on the workboard and ready to go. It looks like the real thing. Whatever that exactly means. 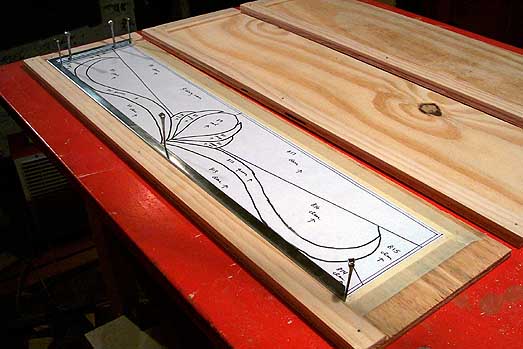
Posted by Michelle at 09:24 PM
| Comments (2)
Monday, December 09, 2002: Back in the Saddle Again
After having taken most of a couple weeks off from stained glass and pretty much everything else, due to bronchitis and sinus infection, a mysterious hand injury, a cold basement, and a giant pile of fence pickets (courtesy Don) blocking my access to the workbench, I put my copy of The John Lennon Collection on the stereo, cranked it up, and got back to work today. I've cut 14 of 17 pieces of one transom, and touched up 11 of those with the grinder. A lovely thing about this design is that it's horizontally symmetrical, so I can flip my pieces over so as to see the glass rather than the bits of pattern paper stuck to them, and still have them fit (more or less) on my building pattern.
I have been using correspondent Bruce's dowel trick for breaking very long straight lines in glass. Works like a charm, and I'm glad he shared it with me. Besides being very effective at keeping the break on the score, it's also a hell of a lot safer to break a big piece of glass when it's lying flat than it would be to do it with running pliers. I'm not having so much luck with tapping. It's said you can control a tough break by first scoring as normal, then turning the glass over and tapping the end of a glass cutter on the underside of the the score to create and then slowly extend a crack along the score line. I've tried it once, on a score too long to trust to running pliers, too far from the edge of the glass to use breaking pliers, and too curvy to rest atop a dowel. My result was a nasty crack through the middle of my piece, which necessitated slow and careful scraping of the pattern piece from the glass using an X-acto knife. Which is SUCH a pain in the ass, takes forever to get it off the glass intact. Grunt work, and the best argument I can think of for cutting glass by tracing it out on a lightbox instead of using paper patterns. My deep dark secret is that I'm not 100% sure my transoms are buildable as I have designed them. Well---not by me, anyway. The first challenge in my pattern is that the orange pieces of the flower-shape sort of notch into the clear glass at their tops, a little bit. It's a challenge because you wouldn't be able to cut a notch out of a piece of glass without breaking it---unless you had four hundred bucks to drop on a ring saw---so I'm relying on the 1/4" supplementary head of my Glastar SuperStar II grinder to create a little notch for the glass to slide into. Just due to the nature of the tool, it won't be able to do exactly what I have designed into my pattern, so some on-the-fly fitting will be required once I get to the point of leading everything. Should be fun. Here's hoping I can make it work. The 1/4" grinder head was a little scary to use for the first time today. I set up my mini table so I had a support surface for my glass at the height of the 1/4" head, and all that worked fine, but when I actually started using it, the grinder head seemed loose. It wiggled some, and too much pressure on the glass against the head would cause the head to try to sort of grab the glass and shoot it at me. When I stopped and removed the mini table, I found that a tiny sort of screw which holds the 1/4" head to the top of the 3/4" head had loosened to the point of falling out when I lifted the 1/4" head. I cannot imagine how. Vibrations from the grinder, maybe? But that's what a grinder does, is vibrate. I'll have to keep an eye on that little screw. Projectile grinder heads are not one of the risks I bargained for when signing up for this little hobby of mine. A very merry Christmas And a happy New Year Let's hope it's a good one Without any fear Posted by Michelle at 08:37 PM
| Comments (1)
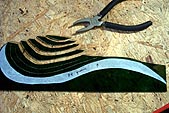
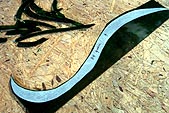
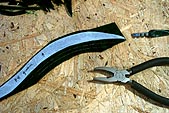
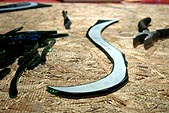
Friday, December 13, 2002: The Making of an S-Shaped Sliver: A Picture Essay
Not pictured: fucking up one's second green S-shape, halfway through breaking out its first inside curve. You didn't need to see that. Posted by Michelle at 12:28 AM
| Comments (0)
Friday, December 13, 2002: Ain't Playin Around
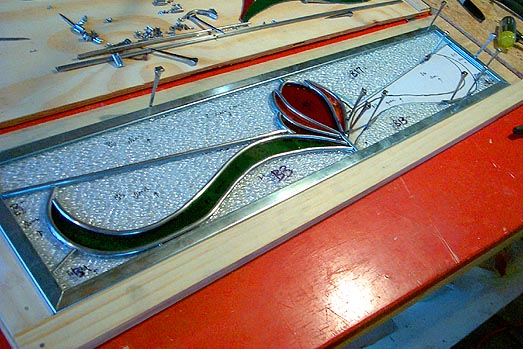
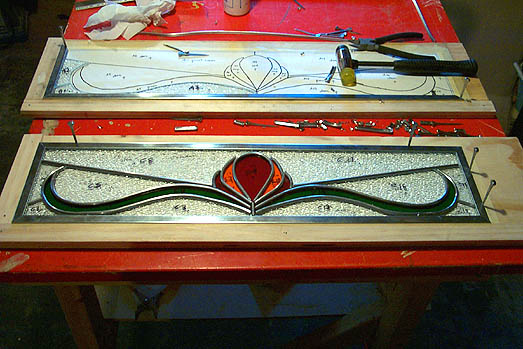
All seventeen pieces of my first transom are cut and ground. I had thought at first I'd build all three transoms at the same time but then I thought that perhaps it would be a good idea to build a first one as a proof-of-concept.
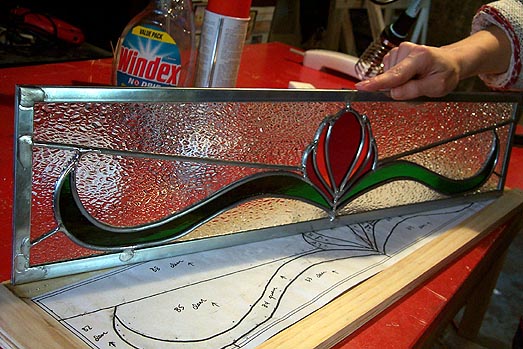
So far, it's looking more or less as I had planned: 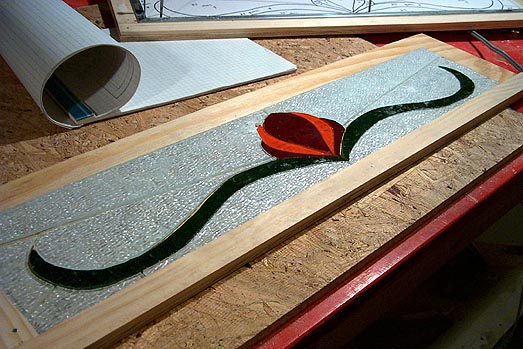
In this picture, all the pieces are reversed so that you can see the glass rather than just the pattern paper which is still glued in place. The next step will be the soaking off of my pattern pieces, and after that, the leading begins. And soon. Don, feeling some antsiness due to the winter weather that has kept him away from his half-built picket fence for some days now, is taking out his frustrations on our transoms. He took down one of the old ones of plain window glass a couple of nights ago, and after studying it thoroughly, has come up with a proof-of-concept of his own for the construction of the frames for my new transoms. 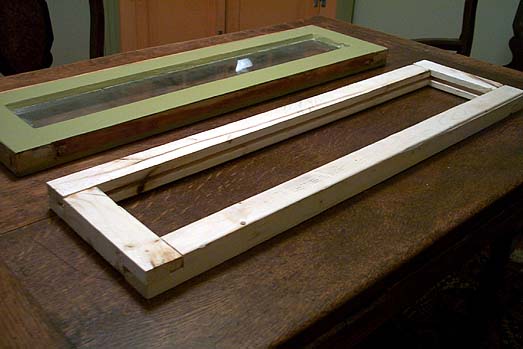
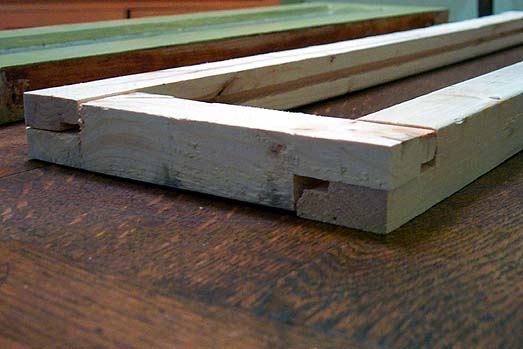
This is, apparently, what heaven looks like to a guy with a brand-new table saw. You can see a sweet little groove all around the inside of the frame pieces, where the stained-glass panel will just slide in nice and neat-like. A little bit of skinny weather-stripping on the insides of the grooves should provide some insurance against the panel's rattling around in the frame. You can also see that Don has a sort of pinwheel construction going, with each of the four sides of the panel being notched above on one side and below on the other. I have been going on and on about how the frames need to be able to come apart in the event of some tragedy necessitating repairs to the stained glass, so I think his plan is to drill screws in through the overlapping notches at each corner. Should be good and sturdy. When I have some glass to put in there, that is. Discussion is ongoing with regards to how to affix the transoms to their frames in the door jambs. The hardware for the old transoms is just a pair of sort of spring-loaded metal pins set through the vertical sides of the transom frames; the pins serve as both mounting and swiveling mechanisms. But even if I could find those neat little pins on any restoration hardware site on the web---and oh, I looked---they won't work for the new transoms. The zinc frame of the stained glass panel will take up much more of the total depth of the transom than the old window glass did, leaving not enough room for swivel pins. So, with the help of the Van Dyke's catalog, we're looking for some nice little hinges and chain, maybe. Or maybe something else yet. We're not sure. Stay tuned, though. Don's all hopped up to do this thing, so now it's no longer my project but rather our project... I dunno, something tells me the schedule just got moved up considerably. Posted by Michelle at 06:02 PM
| Comments (3)
Friday, December 13, 2002: Pictures Can Lie, and Do
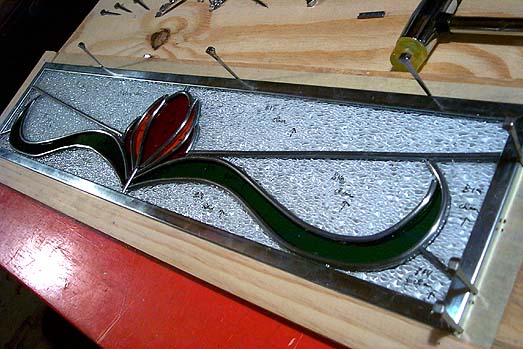
You might think, from the photograph below, that I had gotten off to a good start in leading my first transom.
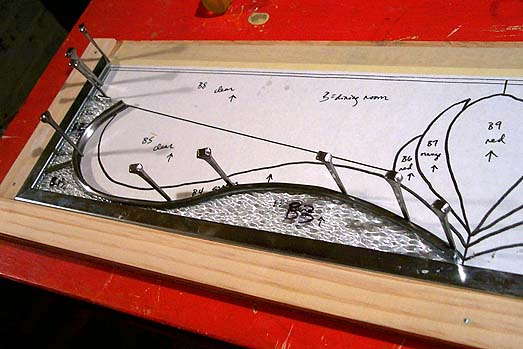
You would be wrong. Turns out that the green S-shaped piece that slides in next to and above the three clear pieces in the photograph is a bit too S-shaped to really want to slide in there properly. It was (is, will be) tough to slide the S-shaped piece firmly into its slot, because its shape and the shape of its neighbors means I can't just slide it in from the side or from above, in one smooth motion. Really I think that instead of fixing in place one piece at a time, from the lower-left corner of the panel inward, I'm going to have to sort of puzzle the first four pieces together as a discrete unit and then fix that into the corner of my workboard. As far as I can tell, such a trick would require me to have about five hands, but I'll worry about that later. I resigned myself to this eventuality only after a lot of futile pushing of glass and bending of lead which resulted in my breaking piece B3, the widest clear piece pictured above, across its skinny panhandle, where the piece is almost entirely swallowed by the channel of the zinc frame. There is some optimism to be had, however: unlike with my last (first) panel, when I soaked the pattern pieces off my cut glass, I did it so that they could be removed in one piece. Three cheers for pattern paper with a waxy, somewhat water-resistant coating. So at least I still have my original pattern piece for re-cutting. Far preferable to having to trace out a piece from a building pattern the accuracy of which was suspect from the start. I'm going to have to figure out how to bend lead to fit a curvy piece of glass without putting undue pressure on the glass itself. That's how I broke B3 up there, and I broke a piece of glass on my crocus panel that way too (though not so noticeably that I didn't just pretend it didn't happen and keep on with the leading). A big challenge. If I knew how to work a jigsaw, I could perhaps create a wooden template in the shape of a curvy glass piece, and bend the lead around its edges. I mean, it'd be a pretty high-maintenance solution, but worth it maybe for glass pieces so skinny or so curvy that bending lead around them is just asking for trouble. Or maybe I should just stick to 5/32" lead until I'm better at all this. My plan for the transoms is to use 1/8" lead for the cut lines and 3/16" lead for the lines of the design proper. Those sizes are only 1/32" smaller and larger, respectively, than the lead I used in the crocus panel, but the difference in the way it feels is huge. The 1/8" lead is so soft that (I know now) it's possible to actually break it while stretching it out, and so soft that once it's stretched it keeps wanting to bend again; the 3/16" lead is harder to cut and harder to bend and probably contributed to tonight's problems. I need to keep in mind that I'm still a huge newbie, that this is only my second piece, that to get discouraged at this stage would be basically pretty arrogant. All the differences between the crocus panel and the transoms make for a lot of room for mistakes, but each one adds something to my knowledge of stained-glass construction. That's what I'm telling myself. In between telling myself, "Self, you're such a clumsy cow." Speaking of. I got through cutting and grinding all my glass without too much bloodshed, but for some reason I kept spouting tiny crimson leaks from my hands tonight when I wasn't looking. They were all such superficial wounds that there was no pain---the issue instead is, when you're working with the lead came, you can see black lead residue rubbing off on your hands. It looks like newsprint smudged onto your palms after a studious read of a fat Sunday edition. Generally it can be washed off without a problem... but when your hands are both sooty with lead and dotted with bleeding nicks, you do begin to feel a little bit of concern for your long-term health. Posted by Michelle at 09:39 PM
| Comments (0)
Sunday, December 15, 2002: Gloat While the Gloating's Good
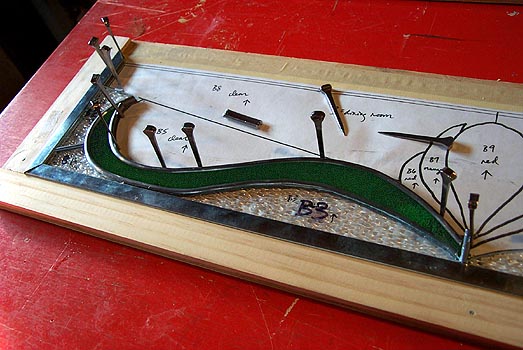
It turns out that the trick to seating the long squiggly green piece properly was to, well, cheat. I slid the zinc frame bordering the panel on the left off the workboard, so that I could slide piece B2 up and out of the construction, so that I could bend back the uppermost end of the long curve of lead, so that I could slide the green piece straight down into its curve from above. Then put back the stuff I'd removed. And now all these pieces are tight. I mean, there's not even the slightest sliver-gap of space showing between lead and glass, there at the lower edge of the green. SWEET. Long curvy lines are so tough to lead and to fit---it doesn't look like I've accomplished much since the last photo, but still I think this is a good stopping point for now, so that I can walk away from it feeling competent and clever, for a change. Posted by Michelle at 02:33 PM
| Comments (0)
Thursday, December 19, 2002: Slow but Steady
Most of this week's expenditure of creative talents has been allocated to the artful wrapping of Christmas gifts (and to the not-so-artful shopping for them, but that's a whole other thing). I have, however, been working on my transom , in fits and starts, during brief spells of otherwise-unclaimed time.
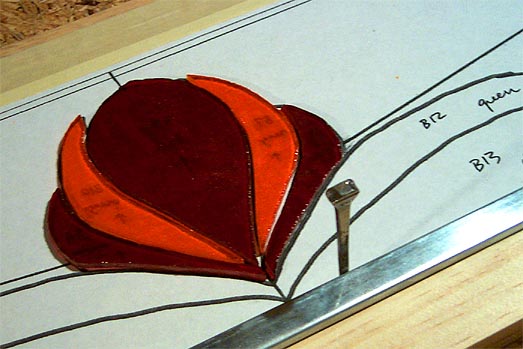
I've got thirteen of seventeen pieces in place right now, but the way I'm having to build this design out, that number is so variable, upwards and downwards, as to mean not a whole hell of a lot. I'm having to do a lot of placing one piece in order to lead an abutting piece, then taking out one of those pieces in order to be able to slide in a piece somewhere else... it's like one of those plastic puzzle grids that used to be given out as children's party favors, where all the sliding numbered tiles would be jumbled out of order and you were to fix it using only the single empty space on the grid and your wits. 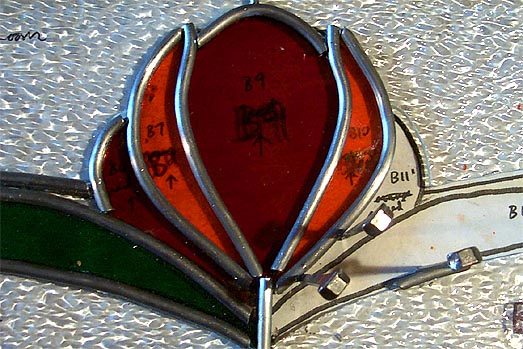
Like this here. After I've finished laying down the flower shape, the big clear piece in the upper right will have to be pulled out again, in order for me to fit in what's left. But for now its presence is crucial to shaping the flower. I am learning about the difficulty of true symmetry in stained glass. It's not that it can't be done, I imagine, it's just that you'd have to be a hell of a lot better than I am. Still, I'm close enough to pattern that I think once the piece is installed, no one will see the asymmetries unless they're looking for them. And I have high hopes for being able to smooth over some of these rough spots during the soldering process. Like that vertical line at the bottom center of the flower shape---right now it's a little loose and a lot crookedy because of the difficulty of getting all the glass to fit snug together in a spot where so many pieces meet---but I can solder it in straight and then all will be well. Speaking of tricks for hiding flaws, I decided this week to ditch my idea of leading the transoms in 3/16" and 1/8" lead. The 1/8" is just too skinny to work with. The wider the face of the lead, the more you can get away with in terms of hiding the edges of a slightly wiggly "straight" line or other cutting/grinding flaws, and I'm discovering I need the forgiveness of wider-faced lead. So it's all 3/16" from here on out. The eighteen or twenty-four feet of 1/8" came I've got in the basement is gonna be there a while, I suspect. Posted by Michelle at 01:49 PM
| Comments (4)
Friday, December 20, 2002: Having Leaded
Finished the leading on transom number one last night. Was really, really surprised to have it go as well as it did. I didn't tell you about the night earlier this week when I not only broke one crucial, difficult piece, but also broke about three of its replacements in their cutting, before finally managing to produce a whole one. Part of me was expecting the corresponding pieces on the right side of the transom to behave just as badly, but no. Plus, bending the lead into curves went much better on the right side than it did on the left, too. I hope my good fortune will hold when I start soldering today. I've mentioned before that the stained glass class I took in the fall focused on mechanics as opposed to design, but one design pointer we were given was not to design pieces where a whole bunch of lead lines converge, as that is an excellent way to end up with an unsightly lead blob at that place. This is advice I totally ignored in the designing of my transom, so it will depend on luck that I not end up with a craggy, leaden mountain range at the base of my flower shape. Posted by Michelle at 10:34 AM
| Comments (3)
Friday, December 20, 2002: Flux, Solder, et Voila

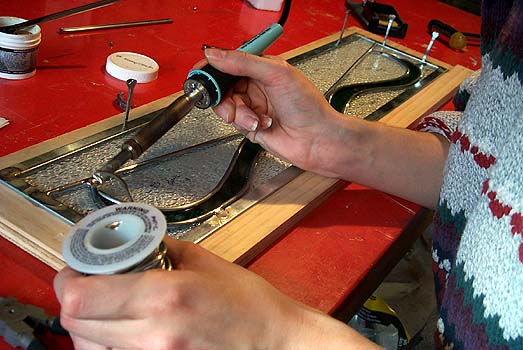
And it's not even too blobby. Next up: soldering the other side. This thing is starting to look like a transom. Posted by Michelle at 04:29 PM
| Comments (2)
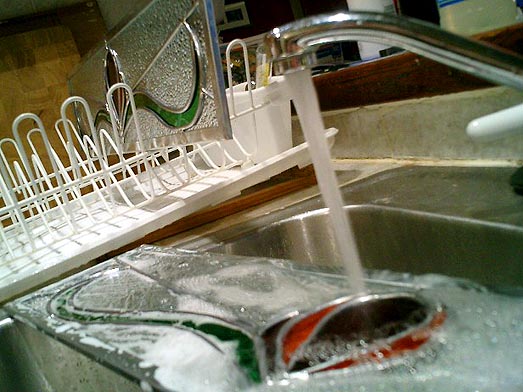
Saturday, December 21, 2002: Now the Messy Part
I've soldered both sides of the transom. Now to go outside and take advantage of what's left of a lovely sunny warm-ish day by puttying in the autumn-like breeze. Posted by Michelle at 03:08 PM
| Comments (4)
Wednesday, December 25, 2002: Squint and Pretend
While I've been playing on the computer tonight, Don has been his usual industrious self. He spent the evening in the basement with the table saw, working out a plan for frames for our transoms. He is not quite there yet, but tonight he produced a test frame that was close enough to right to let us prop up the transom in the door frame to get an idea of how it will look:
Sweet. To bring the record properly up to date, I did get the transom puttied, cleaned up, and spot-patinaed over the weekend. A nice thing is that the wooden frame of the transom will hide the zinc border of the stained glass panel so I don't have to worry about patinaing or polishing it. So the transom panel is finished, just waiting for its pretty wooden frame. There are two more to build, though, so I'm not doing the finished-my-project dance quite yet. Posted by Michelle at 11:16 PM
| Comments (7)
Saturday, December 28, 2002: It's That Time Again
Time for cutting up little scraps of pattern paper. Spied at the drugstore tonight a bag of ten "non-latex" gloves, and made them mine, thinking of the havoc wrought upon my hands last weekend in puttying the first transom. Hot water only turns the putty residue on your hands into sticky black grease; it does come off with Dawn but then I wonder if accumulated putty in the kitchen drains can really be a good thing. Hence, disposable gloves. The above photo and the recent one of Don testing the fit on one of his wooden transom frames were taken with my new toy, a leetle tiny Casio digital camera. Love it; it's vastly smaller and quicker than my old Kodak DC290. It won't replace the more powerful Kodak, but I can turn it on, take a volley of photos, and turn it off again in the same time it takes the Kodak to wake up, so I believe the Exilim may now be the official camera of this weblog, except for timelapse tripod shooting. Only (tiny) problem: its photographs are at a different aspect ratio than those of the DC290, which might require a little bit of adjustment on my part, if not an out-and-out revision of the Adventures in Dangerous Art unified graphic sizing standard. It's turbulent times, I know. Posted by Michelle at 01:23 AM
| Comments (0)
Wednesday, January 01, 2003: Glass Monkey
I would love to have spent serious time this week cutting up pieces of glass, but there has been paying work doing other things, and bleeding from one's fingertips does not pay the bills.
I did get a lot of glass cutting done Saturday, before starting work on my other project Sunday morning. Saturday I cut seventeen pieces of the clear sparkle glass, and the next day on a break from work, cut the remaining three needed for the next two transoms. I'd run a little high on sparkle glass consumption building the first transom, and was worried I would run out. Now I think I might be okay, but that could change if I break stuff in construction, which was the source of a lot of my waste breakage with the first transom. Another respite from work tonight had me cutting the long, tricky green S-shapes. I need four total; tonight I did two that came out beautifully, then got cocky and broke the next two I tried. At that point it was time to get back to winning the bread, so I gave up, and it's just as well. I really need to be careful with the green glass; if I end up needing to buy more it's going to be a great big expensive sheet, because I'm pretty sure no one will sell me three inches by a foot and a half of glass. One or two people had suggested that I rework my transom pattern to make each swoopy S-shape two shorter joined pieces, but being stubborn, I refused to consider it. Wonder if I'll regret it later. When I have cut the last two green S-shapes, I'll have left to cut only ten little bitty pieces of red and orange, which will be a cakewalk in comparison to the more complex, larger shapes of clear sparkle and green. After that, I'll have no choice but to clean out my grinder, which has a shallow reservoir of water directly beneath its removable plastic work surface that serves to contain the unhealthy-for-your-lungs glass dust the grinder produces, which is starting to get full: 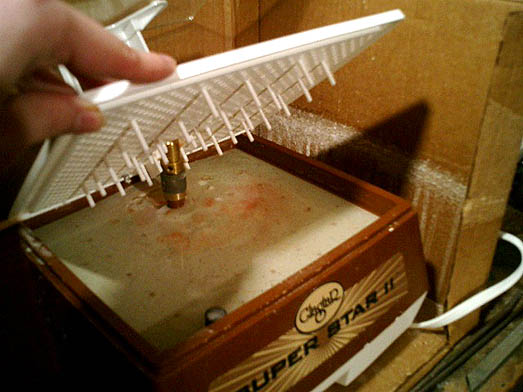
I've never cleaned mine out, but at my glass class last quarter, they locked the grinders up every night, so they needed to be cleaned at the end of each class, and I helped once or twice. I'm here to tell you it's ugly. It's definitely time for mine to be done; the goo in the reservoir is starting to get into the sponge that sits against the grinding head, hardening it and interfering with its life's purpose of water-cooling the head. I hope there's an old paint scraper or putty knife I can have somewhere in the basement. I'll have to figure out how to dispose of the glass-dust sludge, too. If you pour it down the drains it will eventually harden into a rock-solid plumbing nightmare; if you scrape it into the trash it will quickly dry into a respiration nightmare. Only one thing for it: I'll have to go get some takeout hot-and-sour soup, so I can have the container as a sealable, disposable sludge repository. Between the glass dust and the lead came, it's really a wonder they don't make you take out a city permit to do this stuff. Makes me wonder what sorts of dangerous activities are going on in the neighbors' basements. Posted by Michelle at 09:19 PM
| Comments (0)
Sunday, January 05, 2003: Teamwork!
The last few days have seen a virtual whirlwind of transom-building activity here at the house.
I finished cutting all 34 pieces of the two remaining transoms, and did clean out my nasty mess of a grinder. The only grinding I have left to do as of now is to clean up one of the long green S-shapes, plus use the small head on my grinder to make small notches in four pieces, where the orange sections of the flower shapes cut upwards into the clear glass above. I did break one of the evil panhandley pieces on the grinder, even as I was trying hard not to do that very thing. So I'll have to recut it. Watch me procrastinate---if there's anything that will make me hate this project before it's done, it's those four extremely vexing pieces. 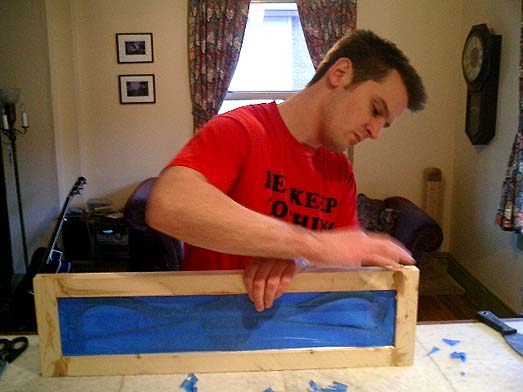
Meanwhile, Don made yet another pile of sawdust in the basement in order to come up with the production version of his transom frame today. He fit it onto the transom, screwed it all together, protected the glass with painters' tape, puttied the seams, and sanded it down. 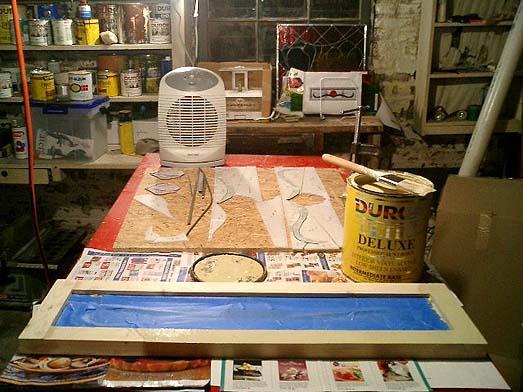
Tonight, after the putty had dried, I took the transom back downstairs and started painting it. The first side will dry overnight and I'll do the other tomorrow. It might take a few coats before I'm totally happy with it, but this transom could be hung up within the next couple of days. Excitement so thick, you could cut it with a knife. Posted by Michelle at 12:56 AM
| Comments (0)
Sunday, January 05, 2003: 8 Photos
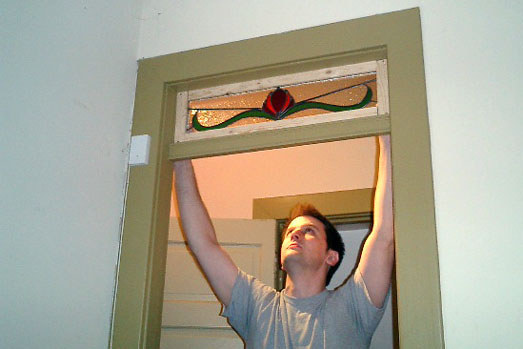
Tonight was a very good night.
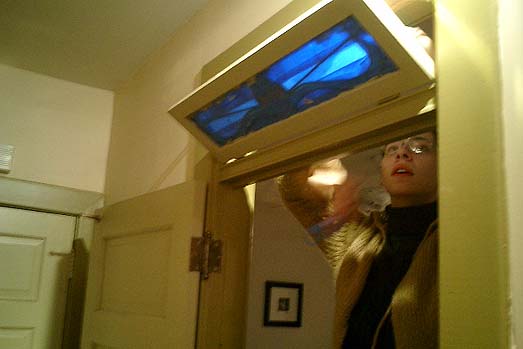
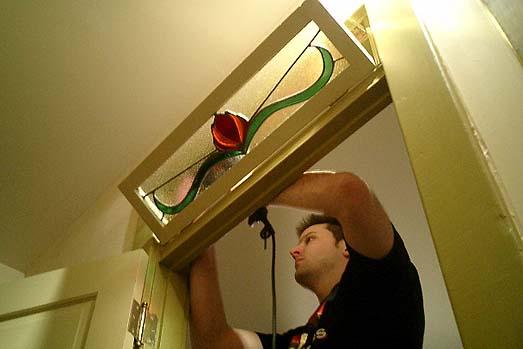
Kicking ass and taking names. I built the glass panel but it would never have become a proper and mounted transom without Don's elite woodworking and hardware skillz. He's awfully clever, that way. I believe I'm going to spend a lot of time just gazing at my transom over the next few days. I'm very curious to see how it looks in daylight tomorrow... and whether it will cast a nuclear-cabbage-shaped ghost of red and orange and green light on the hallway wall behind it. Posted by Michelle at 11:09 PM
| Comments (7)
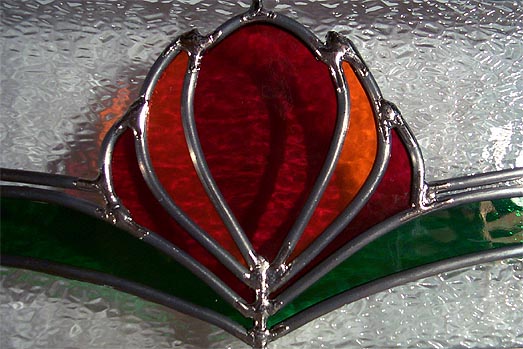
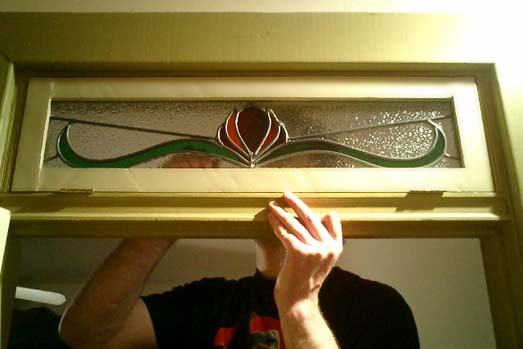
Monday, January 06, 2003: One More
I'm done posting photos of the first installed transom now... really. Just wanted to see how good a photo I could come up with using daylight and my old brick of a Kodak, not nearly so much fun as my new Casio but capable of somewhat crisper photos. Here you can see the "rough rolled" texture in the green glass---the red and orange are exactly the same, but it's harder to capture in such small pieces. I've got no plans or obligations today---well, I did tell Don I'd try to get the sawdust situation here in the house under control---so I think I'll do what little grinding remains for the second and third transoms, and maybe even start leading. Don's birthday is January 19th, and I've been quietly hoping to have all the transoms built by then. It's up to him whether they're installed that quickly, of course, but I bet he'd be tickled just to have the other two panels in hand. Don't tell him though---it's our secret. Lastly, it occurs to me that I have been lax lately in the documentation of flesh wounds. It's not for lack of bleeding---there were a couple of very minor but disproportionately messy incidents over the last week that have left one of my workboards and a couple of my hand tools with, um, let's just say that now you know where to find DNA samples for me, should you ever need them. Also, since I did all the grinding for transoms two and three in a couple of long sessions last week, I developed these perfectly straight, dry-looking slits or cracks along the undersides of my thumbs, an inch or so long, where I use them to push cut glass into the head of the grinder. Those never bled, however, so I assumed they looked a lot uglier than they were. Until I heated up some edamame over the weekend, doused it in kosher salt, and started eating---ouch, ouch, OUCH. I love edamame too much to have done the smart thing and quit (literally) rubbing salt in my wounds. So I just gobbled my soybeans as quickly as possible, thumbs athrob, and resolved to examine anew the funny little thimble-like things some glass shops sell for the prevention of just this problem---til now I've sort of snickered at them, but I'm not laughing now, no sir. Posted by Michelle at 11:04 AM
| Comments (5)
Thursday, January 09, 2003: Mass Production on a Very Small Scale
It's been another busy week, but I still find time to sneak down to the basement and do stained glass a little bit at a time.
I've started leading the second and third transoms. So far so good. Have managed not to break anything yet. You can see from the photo that one of these two transoms is shorter than the other. It's to the bathroom door, which is right next to the guest room/office door, where we installed the first transom earlier this week. I'm going to hope that the slight size difference doesn't become noticeable due to the corresponding difference in the geometry of the transoms. Fingers crossed. Beetlejuice was on TV last night. I used to just adore that movie. I was twelve when it came out, and I wanted to be Winona Ryder's Lydia when I grew up. So Don and I watched part of it. When Catherine O'Hara shrieked from behind the claw-like sculpture pinning her to a wall, "This is my art, and it is dangerous! Do you think I want to die like this?" Don gave me an elbow and a grin. Nice! I hereby declare "Do you think I want to die like this?" the unofficial Adventures in Dangerous Art tagline. Posted by Michelle at 04:16 PM
| Comments (0)
Friday, January 10, 2003: Leet Skillz
I spent a large chunk of today working on transom number two, and got it all leaded. I'm really pleased with it. I broke absolutely nothing in the leading process---a first for me---and this transom has far fewer flaws of symmetry than the first one did. Not that the first one was horribly uneven or anything, but this one's really nice and symmetrical. I still end up with small gaps where lead lines should join, and it's a pain. Most of it's due to all the interlocking pieces of this design in particular, I think... there a lot of putting pieces in and then taking them back out later in order to fit in others, and things tend to shift by fractions of inches when doing all that. So what were perfect lead joints may not be so perfect anymore by the time I've finished shuffling glass in and out of the construction. But I know how to fix the gaps, later, during the soldering process, so it's not a problem, only a bother. I predict in the very near future another sawdust infestation of the entire house. Amazing how you can confine the woodworking tools to one small corner of the basement yet still end up with sawdust all the way up to the attic inside an afternoon. I blame the cats. Posted by Michelle at 04:48 PM
| Comments (2)
Saturday, January 18, 2003: Antici.....
Another busy week. I find now I take glass breaks as if they were smoke breaks: ten hurried and guilt-ridden minutes at a time, in between billing like hell.
You can accomplish a lot of leading ten minutes at a time, though. This photo was taken of transom number three on Wednesday around noon, and my original plans for it were to crow about how nice and tight my lead joints have turned out underneath the flower/cabbage for this last transom: 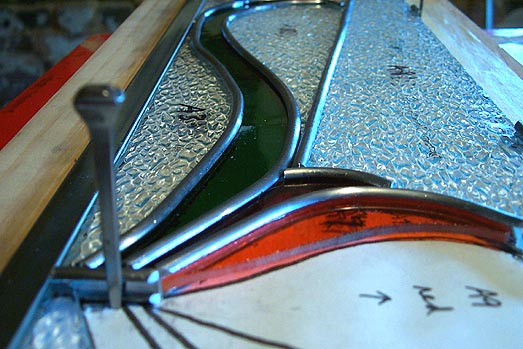
And this photo shows how far it had come by last night (Thursday night): 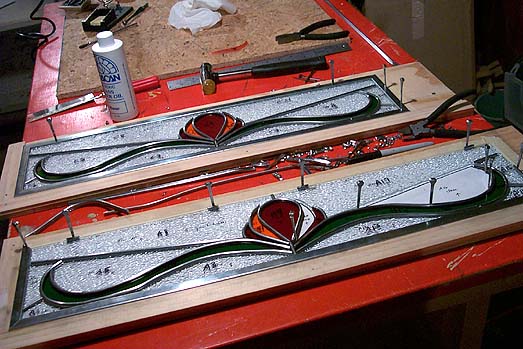
Tomorrow is going to be all about being very very productive with things other than glass, so that I can spend Sunday catering to the whims of the birthday boy. I'm not sure yet whether birthday whims will include my doing any transom-building, but the next time I have an unstructured hour or two, I will finish leading and then get to soldering. Because I live in a godforsaken clime of bitter chill and tiresome snow---the sort of place people live if they haven't the good fortune to live in the South---I have some logistical concern about puttying these transom panels. Last time there was puttying to be done, the weather cooperated by warming up enough to let me work on the front porch without losing any fingers. Now I don't think the temperature is supposed to get up above freezing until Monday afternoon, and puttying makes far too nasty a mess to do it inside. Might have to head out to the shed-garage with my space heater. On the very small plus side, the garage may be the one and only covered shelter on the planet where I am free to do glass and smoke. Posted by Michelle at 12:31 AM
| Comments (1)
Monday, January 20, 2003: Double Your Fun
Finished leading the second and third transoms last night and today, and got them soldered today as well. Didn't get to the really messy work before it was too dark to work outside, so I'll be out on the porch making a mess with putty and whiting in the bitter cold later in the week, I guess.

The transom for the dining room has a gargantuan, hideous solder blob at the base of the flower/cabbage shape, on the side of the panel which will face into the hall. It's horrific. It looks like a growth. I tried to fix it but it wasn't happening. It will bug me for pretty much ever, but oh well. In other news, the first transom does indeed cast a faint ghost-shadow of itself on the hallway wall, when the overhead light in the office is on: 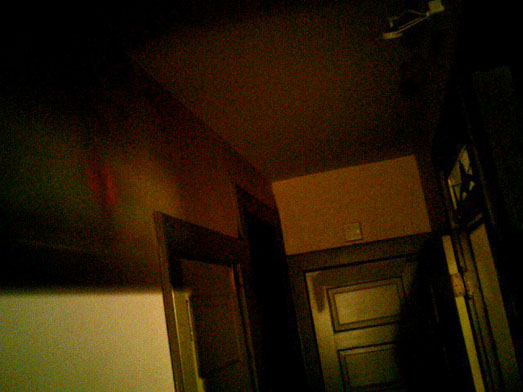
Posted by Michelle at 06:12 PM
| Comments (0)
Tuesday, January 28, 2003: Procrastination Street
It's been cold. Damn cold. Too cold, for example, to expect my cute little space heater to warm the detached shed so that I can work in there. (The space heater is plastic, which is a dead giveaway that there's only so much heat you're going to get out of it.) I keep wondering what I have done to deserve this. Probably there's something.
I finally decided on Sunday that a few degrees above freezing was the best I would get for a while, and bundled myself up to go out on the porch and putty some transoms. It wasn't until I got all my supplies (putty, putty brush, rubber gloves, newspaper, whiting, whiting brush, face mask, little table, transom panels) onto the porch that I realized that the putty objects to the cold weather too: it was dry and crumbly with the cold. So I admitted defeat, dragged everything back inside, and puttied in the basement, hoping that the Shop-Vac would be an appropriate match for flying nuggets of sticky black clay-like goo. When I took my lead class at The Art League last fall, one of the items in the toolkit I was given was a plastic fid. It was one of two things in the toolkit (a copper-wire toothbrush was the other) that our instructor never actually told us what to do with. I discovered on Sunday that the fid is handy for pushing putty underneath the face of lead cames. Much more effective than using my fingernails---which in theory should have been protected by my rubber gloves but instead broke right through them, so I appeared to have auto-mechanic nails for a while there. When I finished puttying the dining-room transom, I took it out into the back yard, and made for the picnic table that Don built last year and that has been good for nothing other than collecting snow just lately. There, I made a hell of a mess with whiting and scrub brush. Synthetic bristles, this time; I found with the first transom that natural bristles don't have the necessary tension to efficiently scrub the excess putty from the glass. When I was done coating the back yard with white powder of a less-wet and less-picturesque sort than the recent standard, I was done with one more transom. Well---I need to patina the solder joints so they aren't so shiny, especially the giant solder glob I ended up with on this particular transom---but that'll take five minutes. At this point, it's in Don's hands for framing and installation. I should have gone ahead and puttied the other transom while I was already dressed for messes, but I was cold and cranky, so I didn't. Just as well---it started snowing again shortly thereafter. But I heard a rumor of temperatures into the forties this coming weekend, and if that happens, I'll be breaking out the Hawaiian Tropic, the flip-flops, and the wide-brimmed straw hat in order to finish my work on the last transom. Posted by Michelle at 12:26 PM
| Comments (6)
Thursday, March 27, 2003: Framing Another Transom
Lest it seem the transom project has been abandoned:
Don has made some progress on the frame for the second transom. This time he decided to work with oak, not spruce, and seemed really pleasantly surprised at how much easier it made the job, just to work with a higher-quality wood. The harder oak shows fewer and shallower table saw marks than the spruce did, which will translate into a requirement for less puttying, less sanding, and fewer coats of paint. The transom isn't installed yet; it's hanging out in the basement in its frame, C-clamped to the workbench. I'm guessing the reason why has something to do with drying wood glue, but where carpentry is concerned, I don't ask questions, I just fetch beers. I'll have to sweet-talk the man of the house into putting in a little more time on that frame soon; I think it's so close to done that one more evening of work could have it installed in its home over the dining room doorway. I still have to putty the third and final transom. I no longer have the excuse of it being too cold to go outside where I can make a proper mess, so I suppose that will happen soonish. Posted by Michelle at 11:58 AM
| Comments (0)
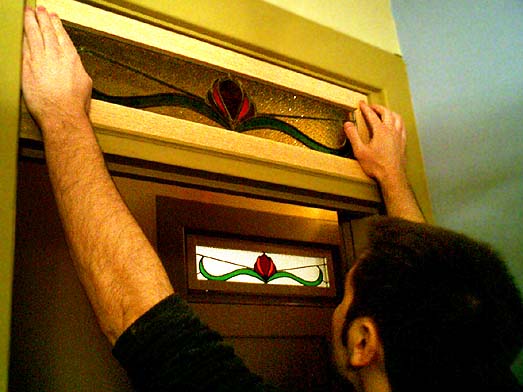
Monday, May 12, 2003: Twinning Transoms
We now have two transoms installed. Yay!
I officially can no longer procrastinate on getting the third and final one puttied. Posted by Michelle at 10:43 PM
| Comments (10)
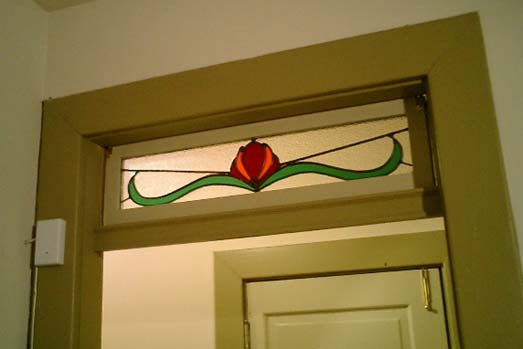
Monday, June 28, 2004: A Much-Delayed Denouement
We finished the last transom, over the bathroom door, a couple of weeks ago.
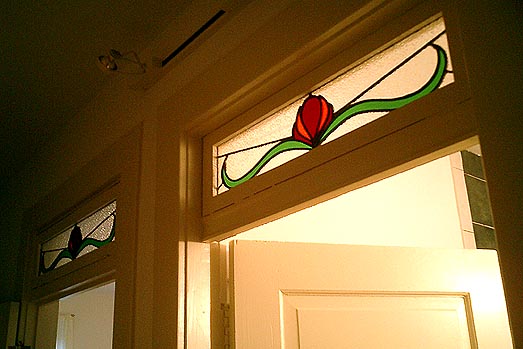
I puttied, a task which had been delayed since---two winters ago, I think? And Don built and installed the frame, which I painted. You may be thinking, "Gosh, didn't the frames on those transoms used to be a muted sage green color?" You'd be right. But that was before we decided to sell our house. Apparently, the first rule of home-selling is to strip your home of any and all personality which may be expressed by way of interior paint colors. We close on the sale of this house, and the purchase of our next, in one month. The transoms convey. Our new house doesn't have transoms, but there's always room for stained glass somewhere. The question is, is there time? Posted by Michelle at 08:18 PM
| Comments (0)
|
|||||||||
| Copyright © 2002-06 Michelle Kinsey Bruns. E-mail me at my first name at this domain. (Take that, spam spiders!)
|
|||||||||||